Description
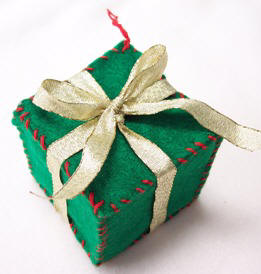
Learn to sew Gift Package Christmas Ornaments from felt! They are an inexpensive way to decorate your Christmas tree and they make a great gift.
Materials and Supplies
Craft Supplies:
- Felt
- Embroidery floss in contrasting color
- 1 yard gold ribbon; 1" wide
- Embroidery needle
- Plastic canvas
Craft Instructions
- Cut six 2 1/2" squares of felt.
- Cut six 2 1/4" squares from plastic canvas.
- With embroidery floss and an embroidery needle, stitch the 6 plastic canvas squares together to form a cube. To do this, simply whip stitch the edges together where each square meets the next one. This is the support which will give your gift a nice square shape when it's done.
- Using embroidery floss as it comes (6 strands together) and an embroidery needle, join the four felt sides and the bottom using a whip stitch (overcast stitch). You should now have a felt box that is open on top. For instructions on the overcast stitch click here.
- Place the plastic canvas square into the felt box.
- Attach your last felt square to the felt box in the same way you attached the other felt squares (whipstitch with embroidery floss). The plastic canvas square should be inside the felt cube before attaching the last side.
- Wrap the gold ribbon around the felt cube as you would with a gift then tie the ribbon in a bow.
- Thread a 6" piece of embroidery thread through one of the corners* of the cube an knot the ends. This is your hanger.
*You should use one of the corners near the bow so that the bow side of the ornament shows when it's hung on the tree.
By Simply changing the size of your squares, you can make different size presents!