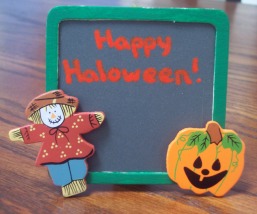
Halloween Table Sign
Materials:
- 3 1/4" square blackboard
- Orange paint pen
- Green acrylic paint
- Paintbrush
- Tacky Glue
- 3 Pre-finished* wooden Halloween figures 1 1/2" - 2" high
- Craft paddle or Wide craft stick or Thick cardboard
- Craft knife
*You may substitute unfinished wooden figures and finish them yourself using paint or markers before proceeding with the following directions.
- Paint the wooden border of your chalkboard with one or two coats of green paint. Let dry completely.
- Glue your wooden figures onto the border of the chalkboard using tacky glue. Before gluing them, lay them out to be sure you like the arrangement.
- Write Happy Halloween on the chalkboard using an orange paint pen. Let dry.
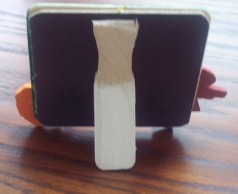
- Make a stand for your sign using one of the two options below or glue a magnet to the back:
Option 1 - Cut a piece of sturdy cardboard measuring 3/4" wide x 3" long. Make a fold line approximately 1 1/4" from one end and glue the top 1 1/4" to the back of your completed slate with tacky glue. Let dry completely before standing up your Halloween sign.
Option 2 - Cut 3" off one end of a wooden craft paddle or a wide craft stick and discard the extra. About 1" from one end, score a line half way through the stick allowing you to bend the stick on this line. Glue the top 1" of the stick to the back of the sign as pictured with tacky glue and let dry completely before standing up your sign.