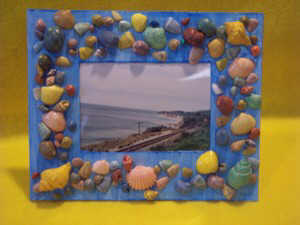
Shell Picture Frame
Materials:
- Small Shells
- Tacky Glue
- 13" x 8" Cardboard
- Paint
- Paintbrush
- Craft Knife
- Ruler & Pencil
- Optional - Hot Glue Gun & Glue Sticks
Also, colored poster board can be used in place of the cardboard eliminating the need to paint the frame.
- Cut 2 pieces of cardboard 8"w x 6 ½" h.
- Take one of the 8" x 6 ½" pieces of cardboard. This will be the front of the frame. If your frame is being made to fit a 3 ½" x 5" picture, you will need to make a 3" x 4 ½" opening. If your picture is 4" x 6" make your opening 3 ½" x 5 ½". To make the opening, mark the center of this cardboard piece and use it to mark the size of the opening you need.
- Using a craft knife and a ruler or straight edge, cut out the opening and save the piece you cut out. It will become the stand for your frame.
- Paint the front piece of your frame. I used blue paint and left the paint streaky to give it a beachy look. Let paint dry.
- Fold one of the 3" ends back 1" from the end. Glue this 1" x 3" section to the front of the other 8" x 6 ½" piece leaving the rest of the stand piece loose. When gluing the stand on, be sure the stand is centered side to side and that the other 3" end is even with the bottom edge of he frame back. [If you made the larger opening, your stand will also be larger.] Set aside and let glue dry.
- With the tacky glue or the hot glue - glue the front of the frame to the back of the frame on 3 sides only leaving the top open for inserting your picture. Be sure to glue close to the edge so you still have an opening big enough for your picture.
- Spread the tacky glue over the entire front of the picture frame. The glue will be on top of the paint but don't worry, the glue will dry clear. An easy way to spread the glue is to squeeze out some glue then spread it with a popsicle stick or plastic knife.
- Place the shells randomly all over the glued area. Let dry completely then place one of your favorite pictures in it.
Variation: For a different look, replace the shells with buttons.