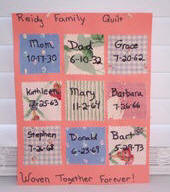
Family Quilt Wall Hanging
Materials:
- 1 Piece Colored Cardstock 8 ½" x 11"
- Permanent marker
- Craft Glue
- Scraps of Fabric - enough to make a 2 ½" square for each family member
- 3/16" hole punch
- 12" piece of ribbon
- Pinking shears
- Cut out one 2 1/2" square of fabric for each family member using the pinking shears. If you have a small family or and odd number of family members, you can make some blank squares to place randomly on your "quilt". I made my "quilt" 9 squares (3 x 3) which fit nicely on an 8 1/2" x 11" sheet of cardstock. For very large families, you could make it on poster board or for small families you could cut the cardstock smaller.
- With a permanent marker, write one family member's name and date of birth on each square.
- Lay them out on the cardstock and when you are happy with their arrangement, glue them in place. Be sure to leave room at both the top and bottom to write.
- At the top, using the hole punch, make one hole approximately 1 1/2" from each end.
- In the space at the top of the quilt write: "Last name" Family Quilt and at the bottom write: Woven Together Forever!
- From the back, poke one end of the ribbon through each hole and make a knot in the end of the ribbon. This will be your hanger.
Variation 1: Add dimension to your Family Quilt by using fabric paint in a squeeze bottle to write on your squares.
Variation 2: For an anniversary party or family reunion use a large piece of poster board and write as directed in step #5. Cut out a stack of fabric squares and ask family members to write their name and date of birth and/or a message on the squares. Glue them on in rows as the squares are completed.
Variation 3: Instead of using poster board or cardstock, use fabric glue and glue the squares to a piece of muslin or other fabric. If you are going to hang it you will need to mount it on a piece of cardboard or thin wood so it will be stiff enough to show all the blocks.