Santa Wall Hanging
Sew a Santa Clause wall hanging from felt to liven up your holiday!
- 11/2" Pink pompom
- 35mm bell
- One O-ring
- Tacky glue
- Powdered Blush
- Polyester Fiberfill (stuffing)
- Sewing machine
- Needle
- Thread
- 24" x 20" Piece of foam 1/2 " thick
- Flesh colored felt; 14" x 12"
- White colored felt; 1 yard
- Black colored felt; 4" square
- Cranberry colored felt; 17" x 20"
1) Trace and cut out the following pieces:
From white felt: 2 mustaches; 2 eyes; 4 eyebrows; 1 beard; 1 backing piece
From flesh color felt: 1 face; 1 lip
From cranberry felt: 1 hat
From black felt: 2 pupils; 1 mouth
From Foam: Cut 1 backing piece but cut it slightly smaller all the way around (about 1/4" smaller)
Note: As you stitch your Santa together, the raw edges will remain open and you will be stitching through the foam as well as the felt.
2) Lay your white felt backing piece on your work surface. Center the foam Santa head on top of the felt back. Lay the face piece on top of the foam and pin in place. Topstitch the sides only of the face about 1/4" from the raw edge.
3) Next, lay the hat on top of your Santa and pin in place. Topstitch all the way around the hat using matching thread.
4) Pin Santa's beard in place and again, topstitch all the way around 1/4" from the raw edge using matching thread. Place Santa's head aside for the moment.
5) Pin the two mustache pieces together then topstitch all the way around.
6) *Pin two eyebrows together and topstitch all the way around. Repeat from * to make the second eyebrow.
7) Hand stitch the bell onto the end of Santa's hat.
8) Hand stitch the O-ring onto the back of Santa's hat to form the hanger. Due to the weight of the bell, you will need to adjust the placement of the O-ring so that Santa will hang straight when he is complete. I pin the O-ring in place before stitching and try hanging it. If it does not balance correctly, move the O-ring right or left, pin in place and test again until it hangs straight.
9) Using tacky glue, attach the black mouth piece on top of the beard. Glue the lip on top of the bottom edge of the mouth.
10) Brush blush on the cheek area.
11) Glue the mustache just above and slightly overlapping the mouth and glue the pink pompom just above and slightly overlapping the mustache.
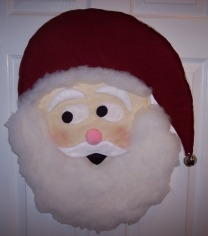
12) Glue the white eyes on your Santa as pictured and glue the pupils inside the whites of the eyes. To finish the face, glue the eyebrows above the eyes.
13) Spread a layer of tacky glue across the bottom of Santa's hat and cover the glue with Fiberfill as pictured.
14) Spread a layer of tacky glue on Santa's beard and cover with a layer of fiberfill being careful not to cover his mouth. Once they glue is dry, Santa is ready to be hung up and enjoyed by all who see him.
Interesting Info: When my daughter was only 14 years old, she drew me a 24" Santa face. From that drawing I was able to create a pattern for the Santa Wall hanging you see here.
Santa is quite large compared to the size of regular printer paper, therefore it takes multiple sheets of paper to make up one full size pattern. To keep it as simple as possible, please click on the links below to bring you to specific pattern pieces and follow the number layout shown here when putting your pattern together. To print the pattern, set your margins to 0, be sure your printer headers and footers are turned off and make sure your pages are printing at 100% (not shrink to fit). To put each of the patterns together, follow the number layout for that specific pattern, and layout the pieces on a flat work surface lining up the drawn lines. Once the pieces are laid out properly, tape them together to get a full size pattern.
| 1 | 2 |
| 3 | 4 |
| 1 | 2 |
| 3 |
| 1 | 2 |
| 1 | 2 | 3 |
| 4 | 5 | 6 |
| 7 | 8 |
Facial features (eyes, eyebrows, mustache, mouth & lip) All on one sheet