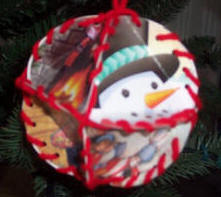
Christmas Card Ornament
This project can provide a great lesson on shapes and geometry for school aged children! Crafted from recycled Christmas cards.
Materials:
- 8 Used (recycled) Christmas cards
- Scissors
- Pen or Pencil
- Glue Stick
- Hole Punch
- Ribbon, Thread or Yarn
- Cut the fronts off the cards and discard the backs.
- Draw a 3" circle on each of the cards and cut out. This gives you 8 circles. When tracing the circles, if you trace a clear cup or glass you will be able to see what will be in your circle and center that design.
- Now, you need to make a triangle template in which all 3 side measure 2 1/2". You can make this template from an unused piece of card.
- Trace this template onto the back of each circle.
- The lines you traced are going to become our fold lines. Fold the edge of each circle toward the front of the circle on these fold lines. The rounded piece you folded toward the front will now be referred to as flaps. Each circle should have 3 flaps on the edges and a triangle in the center.
- We're now ready to assemble the ornament. Take 4 of the circles for the top of the ornament and place the other 4 circles aside for the bottom of the ornament. * Join 2 circles by gluing one side flap from one circle to one side flap on another circle. Use the glue stick to join the other 2 circle in the same way. Now join the remaining 2 side flaps in the first pair to the remaining 2 side flaps in the second pair of circles.
- Repeat from * with bottom 4 circles.
- Now, attach the top and bottom of the ornament by gluing the 4 remaining flaps on the top to the 4 remaining flaps on the bottom.
- Your ball is now complete and all you need is a hanger. To make the hanger, punch 2 holes opposite each other at the top of the ornament and thread thru the piece of ribbon, string or yarn. Knot the two ends together.
Variation #1: This ornament can be made of family photographs instead of cards.
Variation #2: Make larger balls to hang from the ceiling. To do this, use holiday paper plates. Each plate will be one circle. If the rim on the plate is too big, cut it off, just be sure all the circles are the same size. Then, make the triangle template large enough that each point of the triangle comes to the edge of the circle.Variation #3:
After completing the basic ornament, make 5 holes (with a 3/16" hole punch) in each flap. Using coordinating yarn or ribbon and a yarn needle*, do and overcast stitch around the complete ornament starting and ending at the top of the ornament. Leave a 4" piece of yarn when starting and ending. Tie these ends together to create the hanger for your ornament.
* If you don't have a yarn needle, wrap scotch tape tightly around one end of the yarn or ribbon to make it easier to sew with.