Dining Turkey
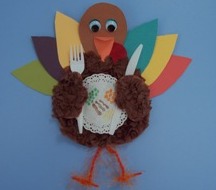
Even turkeys deserve a Thanksgiving feast. Decide what your turkey wants to dine on when you make this decorative turkey. Kids will have fun crumbling and gluing on his brown feathers and adding his brightly colored feathers to his back.
Materials:
- Construction Paper - Brown & Orange
- Cardstock in 6 colors (you can use construction paper if you don't have card stock)
- Two 20mm Blue sequins - optional
- Two 20mm googly eyes
- 2 Orange pipe cleaners (chenille stems)
- Orange Fun Fur yarn by Lion Brand
- 4" Paper doily
- Plastic Fork & knife
- Crayons
- White glue
- Hot glue gun and glue sticks
- Brown crepe paper
- 1 artificial rose petal or red construction paper
- To make the legs, keep one pipe cleaner whole. Cut two 2 3/4" pieces from the second pipe cleaner and put the rest aside.
- Wrap the center of one of the 2 3/4" pieces around the whole pipe cleaner approximately 1" from the end. Bend it to resemble bird feet as pictured. Repeat with the other 2 3/4" piece but attach it to the opposite end of the long pipe cleaner.
- Cut a piece of Fun Fur yarn approximately 2 - 3 times the length of the pipe cleaner and wrap it around the pipe cleaner.
- Bend the pipe cleaner in half and twist at the bend to form a 3/4" loop. Now, bend the legs to give them some shape where the knees would be.
- Trace and cut out one body and two hands from brown construction paper.
- Trace and cut out one beak from orange construction paper and six feathers from assorted colored card stock or construction paper.
- Cut a 4" piece of pipe cleaner, bend it in half and twist the ends together to form a loop. Tape or hot glue* the twisted ends to the back of the head of the turkey with the loop at the top. Be sure you can't see it from the front side.
- Tape or hot glue* the loop of the leg to the back side of the turkey being sure to have the legs hanging below the turkey body.
- Glue the six feathers to the back of the turkey so they extend as pictured.
- Now, glue on the face with white glue by gluing the 2 blue sequence where the eyes will be. Then glue the eyes on top of the sequence but place them a little lower so some of the blue shows above the eyes. Cut the rose petal in half (you only need half) to form the wattle. If you don't have a rose petal, cut a squiggle out of red construction paper for the wattle. Fold the beak almost in half and glue it to the center of the face but first glue the pointed end of the rose petal under the beak so that the wide end sticks out.
- Cut the crepe paper into approximately 1 3/4" squares. Cover the turkey body from the neck down with white glue. An easy way to spread glue over a large area is to spread the glue with a foam applicator brush. You could also use a popsicle stick or paintbrush. Crunch up the crepe paper squares and stick them in the glue.
- Apply white glue to one side of each hand, crunch up the crepe paper squares and stick them in the glue.
- With crayons, draw a picture on the doily of what your turkey wants for dinner or glue on some birdseed.
- Using the hot glue gun set to low temperature, glue the edge of the hands to the turkey body as shown keeping the "fingers" free. The fingers should be pointing inward.
- Slide the doily (dinner plate) under the turkey's fingers and attach it to the belly with white glue.
- With the glue gun*, glue a fork behind one hand and a knife behind the other hand. Refer to the picture for placement.
Let your Turkey dry completely before hanging up.
*Your hot glue gun should be set to low temp. for this project.