Easter Chick Window Decoration
Easter Kids Crafts: Are you looking to do some Easter decorating? If so, this Easter kids craft is a great activity that produces a fun Easter chick perfect for decorating your windows.
Keep the kids busy making chicks to give to their grandparents and neighbors. They will have fun cutting, gluing and stringing beads.
Craft supplies:
- Two 15mm wiggle eyes
- 1 yard 1/8" wide ribbon
- 36 Pony beads
- Tacky glue
- Craft foam; yellow, orange, green, blue and purple
- 3/16" Hole punch
- Suction cup with hook
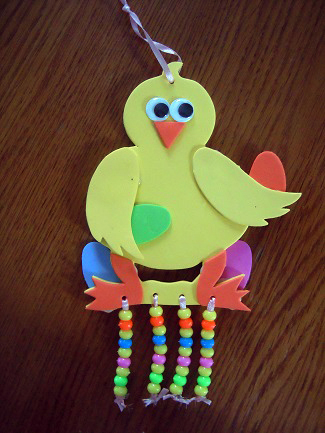
- Using the attached pattern, from yellow craft foam trace and cut out one chick and two wings and from orange one beak and two legs. Cut one egg from each of the following colors blue, green, purple and orange. Note that there is a bar that goes between the two legs, this is to hang your string of beads from.
- Using the hole punch, make a hole where each of the dots are marked on the pattern, one on each foot, one on the top of the head and four along the bottom of the yellow bar.
- Glue the orange legs on top of the yellow legs being sure to line up the hole in each leg with the corresponding hole in the yellow leg. Glue the shoulder portion of each wing to the chick leaving the "hand" end unglued.
- For the face, glue on two wiggle eyes and a beak.
- Randomly glue the four Easter eggs anywhere you like on the chick. We glued one under each hand and the other two behind the chick's feet/legs.
- Cut one 8" piece and four 7" pieces of ribbon. Thread the 8" piece through the hole in the top of the chick's head. Line up the two ends of the ribbon and tie in an overhand knot.
- Thread one of the 7" ribbons through the first hole at the bottom of the chick going through both the orange and yellow layers. Pull the ends so that they are even and the center of the piece of ribbon is in the hole and the two ends are hanging below it. Thread 9 pony beads onto the ribbon passing both ends of the ribbon through the beads. Knot the ribbon as close to the beads as you can. Cut off any excess ribbon and add a drop of glue to keep the knot secure.
- Repeat step 7 with the other three holes in the bottom of your chick. Note that the two center holes only have one layer of craft foam.
- Attach the suction cup to any window or mirror and use the ribbon at the top of the head to hang your chick from the hook.
Idea: You can change the orientation of the arms so they both turn in, both turn out or so that they both go in the same direction (as pictured above).
You will need Acrobat Reader to view the pattern as it is a PDF. ![]()