Paper Plate Pumpkin
Paper plate crafts are perfect as a preschool craft. Our paper plate pumpkins are made by painting and gluing which are two activities that kids of all ages love. Young children will be able to complete this project with little assistance.
Craft Supplies:
- 10" Paper plate*
- Orange paint (washable kids poster paint or acrylic paint)
- Paint brush
- White glue or glue dots
- Twist tie or a 4" piece of pipe cleaner
- 2 Large craft foam flower shapes (2" to 2.25")
- 5 Small craft foam flower shapes (1" to 1.25")
- 1 Craft foam circle (3/4" to 1")
- Craft foam; small amount brown and green**
*We used a 10" plate but you can actually use any size you have on hand.
**We used two different shades of green for the leaves but you can use just one.
- If using a pipe cleaner for the hanger cut a 4" piece and save the rest for another project. Twist the two ends of your pipe cleaner or twist tie together forming a loop. Staple the loop to the front rim of your plate at the point where the straight and looped parts of the twist tie/pipe cleaner come together then bend the twisted end up and over the staple so that the hanger will not slide off.
- Flip the plate upside down on your work surface and paint the back side of the plate orange. Let dry.
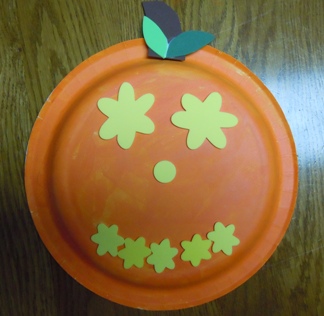
- Before gluing on the face, make sure the plate is turned so that the hanger is at the top of your pumpkin. Glue the two large yellow flower shapes onto the plate for eyes. Glue the dot below the eyes for a nose. Then glue the five smaller flowers onto the plate to form a mouth (refer to the photo for placement).
- Cut a stem shape from brown craft foam and two leaves from green craft foam.
- Glue the stem and leaves to the top rim of the plate