Recycled CD Snowman
Craft Supplies:
- Black craft foam
- 4 cds (compact discs)
- 13 corks; 1/2" x 3/4"
- 1 Regular size cork (our cork was 1 3/4" long)
- One 1 1/2" x 1 1/2" x 3/4" block of Styrofoam
- Acrylic paint; white, orange, green, black & blue
- Paint brush
- Hot glue gun and glue sticks
- Sharp knife, craft knife or Exacto knife
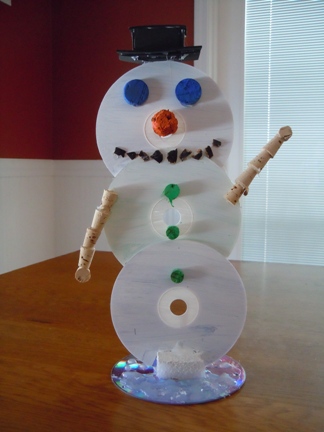
- Paint the Styrofoam block white, Set aside to dry. Paint one side of three cds white. It may take more than one coat for good coverage. Set aside to dry.
- Cut two 1/4" thick slices off the wider end of the long cork. Paint them blue and set them aside to dry. These will be the snowman's eyes.
- Take the remaining piece from the long cork and widdle away at it with a sharp knife to give it more of a carrot shape. Save the pieces you shave off and paint them black. These will make up the snowman's mouth.
- Paint the large piece of cork you widdled orange.
- Cut 3 of the small corks in half. Paint the 3 narrower pieces green for the snowman's buttons. Save two of the wider pieces for the snowman's hands.
- To make the hat, cut the following pieces from a piece of black craft foam: one piece 1 1/4" x 2 3/4"; one piece 1 3/4" x 3/4"; two pieces 1" x 3/4"; two pieces 1 1/2" x 3/4". You are going to build the hat kind of like making a house of cards then use hot glue to hold the pieces together. To assemble it, place the 1 3/4" x 2 3/4" piece flat on your work surface. Take the two 1" x 3/4" and 1 1/2" x 3/4" pieces and stand them up on end on top of the first piece you laid down having all the edges touch. (to clarify, the long side of each piece is the edge that will be touching the base piece which is laying flat on your work surface) Glue in place. Glue the 1 3/4" x 3/4" piece of craft foam on top of the box shape you made with the other pieces. This tops off your hat.
- To assemble your snowman, place the unpainted cd flat on your work surface shinny side up and glue the white Styrofoam block to the center of the cd.
- Glue the three painted cds together so that they are overlapping by about 1 1/2". Make sure that the painted sides are all on the same side. Cut a slice in the center of the block of Styrofoam and slide one end of the three cds into the slit and glue in place.
- Dribble some hot glue on the shinny side of the base cd for an icy/snowy look.
- Glue the blue cork "eyes" and the orange "carrot" nose onto the top cd (on the white side). Glue the little black pieces of cork under the nose for a "coal mouth" and glue the three green cork "buttons" down the front of the snowman. Two of the buttons should be on the center cd and one should be on the bottom cd.
- Make the arms by gluing four of the small corks together end to end with all the narrow ends pointing in the same direction. Then glue on the hand piece you cut earlier (in step 5). The piece of cork used for the hand should be turned so that you glue the side of the cork hand to the narrow end of the cork arm. Repeat to make a second arm.
- Glue the arms to the front side of the middle cd. Glue the hat on top of the snowman's head.
You have just saved 4 old cds from being thrown into a landfill.
Tip: If you want to make this snowman with younger children, you can do the hot gluing but they can do all the painting and some of the parts can be attached with glue dots instead of the hot glue. I would definitely use the hot glue when attaching the cds together and when attaching the Styrofoam block to the base cd and when attaching the 3 white cds to the Styrofoam block. I would also use the hot glue to attach the hat and the arms to the snowman but you can assemble the arms with glue dots. You can also add all the facial features and the buttons with glue dots.