Pocket Snowman Ornament
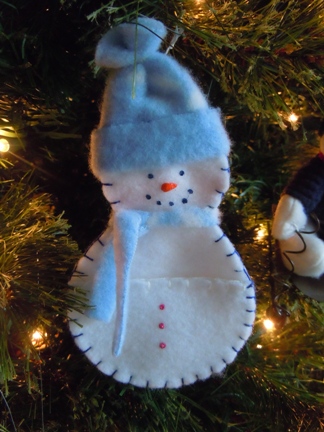
Snowman sewing pattern and easy to follow instructions to stitch up this adorable snowman Christmas ornament with a secret. He has a pocket in his belly perfect for holding that little special gift. Some gift suggestions to put in the pocket are gift cards, cash, jewelry or even a mini candy cane.
You can easily personalize these snowmen by writing a name on the pocket with fabric paint instead of painting the buttons on him.
Materials:
- White felt
- Fleece
- Iron on interfacing
- Fabric paint; orange, black and a color of choice for buttons
- Embroidery floss; white and another color
- Needle
- Common pins
Optional top hat:
- Black craft foam
-
Plaid fabric (or homespun fabric)
- Trace and cut out two snowman bodies from felt.
- Trace and cut one pocket from felt and one from interfacing.
- Iron the interfacing pocket to the felt pocket following the manufacturer's instructions.
- Using two strands of white embroidery floss and the blanket stitch, stitch across the flat edge of the pocket.
- Lay the two snowman bodies on top of each other and place the pocket on top of one of the bodies. Pin them all together.
- Stitch around the outer edge of the snowman using the blanket stitch and two strands of embroidery floss in a color of your choice (the sample was made with blue floss) Be sure to stitch through both layers of the snowman and where applicable through the pocket.
- Cut a 9" x 1/2" strip of fleece and tie it around the snowman's neck as a scarf.
- Cut a 2 3/4" h x 4.5" w piece of fleece. Fold it in half right sides together so that the two short sides match up and sew these together forming a tube. Right side out the tube. Gather one end of the tube and either wrap a tiny hair elastic around it or tie a piece of string around it. This is now the top of the hat.
- Fold the bottom edge of the hat up forming a cuff and place the hat on your snowman's head. Either glue or stitch the hat in place.
- Cut an 8" piece of crochet thread or elastic thread and thread it through the back of your snowman's hat. Tie the two ends of the string together in an over hand knot. This is your ornament hanger.
- With black fabric paint, make two dots for eyes and 5 or 6 dots for a mouth.
- With orange fabric paint, make a carrot nose by starting to squeeze out some paint and release the pressure as you pull the bottle to the left or to the right. Practice on a piece of wax paper or a paper towel.
- Either make three colored dots on the pocket with fabric paint (as buttons) or personalize your snowman by writing a name across the pocket with the fabric paint.
Optional: To make a top hat instead of using the winter (stocking) hat cut out a top hat from black craft foam. Glue a strip of fabric around the hat as pictured and glue the hat to the front of the snowman's head. You would still make the hanger the same way except go through the back layer of the snowman's head instead of going through the hat.
You will need Acrobat Reader to view the pattern as it is a PDF. ![]()