Description
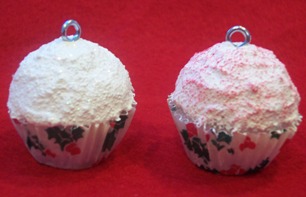
Make some yummy looking treats for your Christmas tree. These kid friendly ornaments make a fun gift to bring to a home with children.
Materials and Supplies
Craft Supplies:
- Duncan Snow Accents or Aleene's True Snow
- Popsicle stick or a disposable plastic knife
- Indoor varnish (sold with the acrylic paints)
- Paintbrush
- Hot glue gun with glue sticks
- Petite muffin paper; 1" base (mini muffin paper 1 1/4" base)
- 1" Styrofoam ball (1 1/2" Styrofoam ball)
- Screw eye hook
- Optional: Ultrafine glitter; very small beads, paint or fabric paint in squeeze bottle
Craft Instructions
- Hot glue the Styrofoam ball inside the muffin paper being sure to glue both the bottom and the sides of the paper to the Styrofoam ball.
- Using the popsicle stick or plastic knife, spread a layer of 'Snow Accents' or 'True Snow' on the portion of the Styrofoam ball that is above the muffin paper. Be careful not to get any of the snow/frosting on the muffin paper.
- While the snow is still wet, insert a screw eye hook into the top of the cupcake. Optional: While the "frosting" is still wet, sprinkle some ultrafine glitter on it or place some small beads into the "frosting". Use a toothpick or your fingernail to push the beads into the snow/frosting part of the way.
- Let the snow/frosting dry completely before continuing.
- Apply 1 -2 coats of interior varnish (the type that is sold with the acrylic paints in your local craft store) to the muffin paper letting dry completely between coats.
- Attach a piece of string or an ornament hook to the eye hook and your cupcake is ready to be hung on the tree.
Optional:
- Using fabric paint in a squeeze bottle, make little dots or dashes in various colors on the top of the cupcake to represent sprinkles.
- To add some color to your frosting, simply dry brush some acrylic paint onto the frosting once it is completely dry. Check out our hints and tips section for instructions on the dry brush technique.