Learn the
basics to make your very own gingerbread house,
and get suggestions for decorating it with your
favorite candies along with free step by
step instructions to make this special holiday
treat!
Click on one of the following links to bring
you directly to that category:
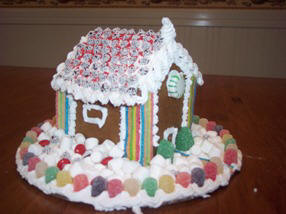
Gingerbread houses are a wonderful
holiday tradition. At our home, each family
member decorates their own individual house each
year using their favorite candies. However,
many families choose to decorate one larger
house for their family to enjoy.
Here you will find
the basic information on building gingerbread
houses including our favorite icing recipe and a
pattern for individual size houses along with
hints and tips. For more than a dozen
years, I have been baking and assembling between
50 and 150 individual houses per year and I
would like to share some of that knowledge with
you.
First, you will need to choose a gingerbread
recipe. When I first started making
gingerbread houses, I used a boxed gingerbread
mix. They tasted fine and were quick and
easy but became costly when making houses for a
large group. The mixes may have changed a
bit our the years but at the time, one mix would
make two individual size houses. I now
make my gingerbread using the recipe in the New Cook Book (Better Homes and Garden) From this recipe, I get approximately four to
five houses from each batch of cookie dough.
There are many good recipes to choose from out
there, but I like this one as it is so simple.
It does not require you to cook any of the
ingredients on the stove top as do some other
recipes and it can be made very easily in a
stand mixer.
When I make my houses, I use gingerbread house
cookie cutters which make it much quicker and
easier. Gingerbread House Bake Set
comes with the cookie cutters needed to make a
complete house. If you are using cookie
cutters to make your house use them as you would
use any cookie cutters. If you do not have
the cookie cutters, print out the pattern we
have provided (there is a link at the bottom of
the page) but be sure that it is set to 100%
when printing or your house will not be the
correct size. I suggest printing the
pattern on cardstock but if you don't have
cardstock, print it on regular paper then
transfer it to a clean piece of cardboard.
After printing, carefully cut out the pattern.
Sprinkle some flour on the dough after you have
rolled it out so the cardstock doesn't stick.
Using a knife, trace around the pattern cutting
through the dough. You will need two each
of the roof, side and end pieces for a total of
6 cookies per house.
Bake your gingerbread on an un-greased cookie
sheet using the time and temperature specified
in your recipe. If you bake a larger
house, you may need additional baking time.
The gingerbread is done cooking when the edges
are firm. It is important to cool you
cookies for two minutes before removing them
from the cookie sheet but be sure they do not
cool completely before removing them or it will
become difficult to get them off the pan and
they may crack. Let the gingerbread cool
completely on a wire rack and if possible leave
them to cool and harden slightly on the rack for
a couple of hours. If your cookies are too
soft, the house will collapse when you try to
decorate it. If you feel the cookies are
too soft, leave them on the wire rack for a
longer period of time and they will harden a
bit.
As with the gingerbread, there are many recipes
for icing. I use the following recipe and
have had very good luck with it. Be
careful to measure accurately as the proper
icing consistency is very important.
Royal Icing
3 tablespoons Meringue
Powder*
1 lb. (4 cups) sifted
confectioners' sugar
6 tablespoons warm water
Beat all ingredients until icing
forms peaks which is 7-10 minutes at low speed
with a heavy-duty mixer, or 10-12 minutes at
high speed with a hand-held mixer. (Makes
3 cups)
When you build your house you will need to
either build it on a base or make it then attach
the house to a base. Wilton 12-Inch Cake Circle, 8-Pack are a great base for your house. To
attach the house to your base, simply use some
of the Royal icing. Don't forget to
decorate the base.
Each house requires
the following cookies: 2 sides, 2 roof
sections and 2 ends. Fill a pastry bag**
with the icing and attach a large piping tip.
I like to use a #4 or larger tip. The
outside or right side of the cookies should be
the side that was face up during baking.
Place one of the end
cookies on your work surface with the wrong side
facing up. Squeeze a line of icing just
inside each edge as pictured.
Carefully
stand this piece up and butt the end of one side
piece up against each of the frosting lines you
squeezed out.
Now, place your
remaining end cookie on your work surface with
the
wrong side facing up. Squeeze out two
lines of icing as you did on the first end
piece. Carefully stand this end piece up
and butt it up against the two side pieces which
are already attached to the first end cookie.
Let this set for about a half hour allowing
the frosting to harden and the house to become
more stable. Be sure to keep your
decorating (pastry) bag covered with a damp
cloth during this waiting period to keep the
frosting from drying out and hardening.
After your walls
have had a chance to set, it is now time to add
the roof. Before attaching the roof, run a
bead of frosting up and over the peak of each
end piece. Also, run a bead of frosting
along one of the longer sides of one roof cookie
on the back side of the cookie. This long
straight edge will be at the peak when
assembled.
Carefully place the two roof pieces on top
of the house as shown. When you do this,
gently but firmly press the roof sections into
the frosting on the peaks and butt the long edge
of one of the roof sections up against the
frosting line on the other roof section.
Let the house set
for a few hours or overnight if possible to let
the frosting harden. This will make your
house much more sturdy when you start to
decorate it.
**When filling the pastry bag, fold
the top of the bag down on the outside
and only fill the bag about half to
two-thirds full. Unfold the bag and
twist the bag just above the top of the
frosting to keep the frosting from
coming out the top of the bag as you use
it.
If you are making a larger house, you can
either find a larger scale pattern, increase the
size of our pattern when you print it or design
your own pattern.
When assembling a
larger size house, you may need to place cans
(full vegetable cans or whatever you have on
hand) against the house to hold the walls in
place until the frosting sets up. Also, on
larger houses give the frosting a couple of
hours to harden before adding the roof.
Now comes the best part . . .decorating
your gingerbread house.
When our family
members and friends all get together to decorate
our gingerbread houses, we have 30 - 40 people
ages 1 - 76 all decorating their own individual
house at the same time. To accommodate
this large number of people, we place a
disposable bowl filled with frosting between
every two people and give each a plastic knife
(for easy clean up). Generally we each
frost our roof first using the knife and press
candies into the frosting covered roof to
decorate it.
Next, we either use
the knife to apply frosting to individual pieces
of candy and stick them on the house or we use
one of several decorating (pastry) bags filled
with frosting to attach the candies.
Usually we have one bag of frosting for every 5
or 6 guests to share.
The bag of icing can
be used to make many designs including icicles
hanging from the roof. It can also be used
to make windows and/or doors on your house.
See the additional ideas section for other ways
to make windows.
The sky is the limit
to the many types of candy you can use to
decorate your house. If you plan to
decorate the house and keep it for yourself to
eat then choose the types of candy you enjoy
eating. Below are some suggestions on
candy types and ways to use them. All
candies should be unwrapped prior to attaching
them to the house.
Firewood pile - Mini Tootsie Rolls piled
up
Round window above the door -Red & white
(or green & white) hard Peppermints
Doors - Zebra Gum (striped gum), Fruit
Roll Ups, or draw them on with icing in an
icing bag
Roofs - Necco Wafers, gum drops, M & Ms,
Frosted Shredded Wheat cereal, mini fruit
slices, Snowcaps, Nonpareils
Lamp Post - Peppermint stick with a
gumdrop on top
Fence - upside down pretzels
Trees - Spearmint leaves (green gum
drops shaped like leaves)
Roof outline - Twizzlers or Nerds rope
Walkways - Candy stones, Necco Wafers,
M&Ms
Snowmen - Marshmallows (regular size)
use a gumdrop on top of a Necco Wafer to
make a hat, pinch off little pieces of
gumdrop to make eyes, mouth, buttons etc.
and use pretzel sticks for arms.
Chimney - Sugar cubes or marshmallows
Frost your base and sprinkle it with
mini marshmallows or coconut for a snowy
look.
Little ones can be given a variety of
cereals to decorate their house if you are
looking for an alternative to candy
Additional decorating ideas:
If you want to make
cut out windows use a knife to cut them out of
the raw dough Before baking. I
recommend putting the cookie on the cookie sheet
before cutting the window as it is more delicate
to move after the window is cut.
If you want stained
glass windows, cut a window out of your dough
before baking. Crush some Jolly Rancher hard
candies by placing them in a food safe plastic
bag (freezer bags work best) and using a rolling
pin or meat tenderizer crush them. It is a
good idea to place a wooden cutting board under
the candies before hitting them with the meat
tenderizer. Next, fill in the window area
with the crushed candies and bake as you
normally would. Experiment by adding more
than one color hard candies to each window.
When the gingerbread houses are completed, we
wrap each house individually by crisscrossing
two sheets of plastic wrap (make sure they are
long enough to reach up and over the house).
Then place the house on top of where the two
sheets intersect. Pull the four ends of
the plastic wrap up and over the house and
gather them together. Tie the ends
securely with a ribbon or yarn. If you
have to transport the houses, hold the gathered
plastic wrap in one hand and place your other
hand under the base of the house.
A 5 pound bag of flour contains
approximately 15 cups of flour
A 3 pound can of shortening contains
approximately 6 cups of shortening
An 8 ounce can of meringue makes about
six pounds or six batches of frosting with
the recipe we provided.
When making many houses, to keep costs
down we use white Styrofoam plates instead
of cake boards as a base for each house, but
these are only good for the individual size
houses and are not as sturdy.
We are in the process of setting up a photo
gallery of completed Gingerbread Houses for our
guests to enjoy. If you would like to have
a house you decorated added to our photo
gallery, please e-mail us the photo along with
your first name, city, state and if a child
decorated the house - their age. Please
send the picture of just the house. We
reserve the right to crop out some of the
background allowing us to focus on the house.