Description
Introduce your family to the art of paper mache. This craft project is fun for all ages and once made will help decorate your home and bring you cheer all winter long. Fun family craft activity. Don't wait until the last minute to make this snowman because you have to allow time for him to dry.
Materials and Supplies
Craft Supplies:
- Commercial Paper Mache product such as Celluclay
- Three 1" buttons
- Five 1/2" Black Buttons
- Two 25mm Googly eyes
- 2" Orange pompom
- Fleece, 2 pieces (36" x 3" & 22" x 10")
- White acrylic paint
- Paintbrush
- Powdered blush
- Hot glue gun* with glue sticks
- 2 Balloons
- Painters tape, making tape or duct tape
- An elastic
You can use tacky glue instead of hot glue except when gluing the hat seam.
Craft Instructions
Directions are for a 12" tall snowman however, you can adjust this project for any size snowman.
- Inflate one balloon to approximately 6 1/2". Inflate a second balloon to approximately 5 1/2".
- Tape the two balloons together. This forms the basic shape for your snowman.
- Mix the Paper Mache according to the manufacturer's directions.
- Start applying the Paper Mache to the balloons. Leave a 2" circle uncovered in the center of the bottom on the larger balloon. Also, on the bottom of the larger balloon, apply the Paper Mache so that it is relatively flat allowing the snowman to stand up.
- Once the two balloons are covered in Paper Mache, set the snowman aside until it is completely dry. Depending on humidity, this may take several days. When the upper portion is dry lay the snowman on his side so the bottom can finish drying.
Tips:
- Place your snowman on a wire cooling rack to improve air circulation while drying.
- Never place your drying snowman next to a heat source or in the direct sunlight while the Paper Mache dries. If it gets hot, the balloons will expand and your Paper Mache will crack.
- When your snowman is completely dry, use a pin to pop the balloons and pull them out the opening you left in the bottom of your snowman.
- Using white acrylic paint, paint your snowman. Let dry completely.
- Cut one piece of fleece 36" x 3" and one piece 22" x 10". When you cut the fleece, both pieces should stretch in the long direction. Fleece only stretches in one direction so, if the long side is not stretchy, turn your fabric before cutting out your pieces.
- Tie the 3" x 36" piece of fleece around your snowman's neck for a scarf. Cut each end on an angle then, cut slits in each end that are approximately 1/2" wide and 1 1/4" long.
- Make a hat with the 22" x 10" piece of fleece by overlapping the two 10" ends, forming a tube, and hot glue or sew them in place.
- Place the tube on top of the snowman's head and cuff up the bottom. Gather the top of the tube and secure with an elastic. Cut slits in the top of the hat (the portion above the elastic) approximately every 3/4".
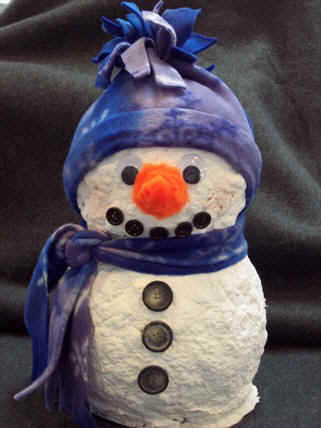
- To make a carrot nose, cut one side of the pompom flat. then, trim the rest of the pompom so that it is cone shaped.
- Glue the flat side of the pompom to the snowman's face as a nose. Glue the googly eyes above the nose and glue the five 1/2" buttons below the nose as a mouth. Apply powdered blush to the cheeks.
- Glue three 1" buttons down the front of the snowman.