Description
Christmas craft idea ~
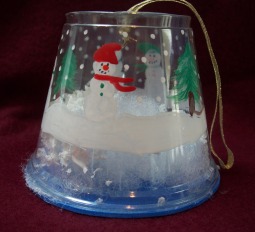
You'll bring delight to a child's eyes when they see this kid friendly snow globe ornament hanging on the Christmas tree. Make some today with the free craft instructions below. They are inexpensive to make.
Materials and Supplies
Craft Supplies:
- Thin Ribbon
- Hot glue gun & glue sticks
- 9oz Clear plastic cup*
- Polyester Fiberfil (stuffing)
- Paint Pens
- Artificial Snowflakes
- Blue craft foam; 4" square
*The type that is short and wide at the mouth.
Craft Instructions
- Using the point of a ball point pen, poke a hole in the center of the bottom of the cup.
- Cut a 9" piece of ribbon. Fold the ribbon in half and thread the two loose ends through the hole, going from the outside to the inside of the cup. On the inside, knot the two ends together in an overhand knot. You should now have a loop coming out of the bottom of the cup.
- Trace the rim of the cup onto the blue craft foam. Cut out.
- Glue a small amount of Fiberfil to the center of the craft foam circle. The Fiberfil should cover most of the craft foam circle but leave the outside edge of the craft foam free from the fiberfill.
- Holding the cup upright (as if you were drinking from it), place 1 to 2 tablespoons of fake snow inside the cup. Run a bead of hot glue around the rim of the cup and place the craft foam circle on top of the cup with the Fiberfil inside the cup. Gently press the craft foam onto the rim of the cup (where the glue is).
- Turn the cup upside down and draw a snow scene on the outside of the cup using paint pens. To make the dots for the eyes and mouth, dip the end of a toothpick into paint and touch to the surface where you want a dot. Let the paint dry completely before hanging your ornament on the tree.