Description
Use this Manger to Teach Children the Reason for the Season!
Directions for Use: Put the Baby Jesus away until Christmas Day. At the beginning of Advent, place the straw in a bowl next to the manger. Each time a child does a good deed or says an extra prayer he or she places one straw in the manger. If enough good deeds are done throughout the Advent season, Baby Jesus will have a nice comfy place to lay when he is placed in the manger early Christmas morning.
Materials and Supplies
Craft Supplies:
- 35-40 Skinny Sticks
- Hot glue gun & glue sticks
- Masking tape
- craft snips or sharp scissors
- Straw
- White fabric
- Doll, approximately 4 ½" long
Craft Instructions
- Lay 10 sticks flat on the table - Horizontally - so that they are all touching side to side. Temporarily lay a piece of masking tape down the center of them so they don't shirt while you glue them.
- You will now need to lay 2 sticks vertically across the horizontal 10. Position these sticks so the top of them remains 1/2" above the top horizontal stick and so there is one inch to the left of the 1st stick and 1" to the right of the2nd stick. Now glue the two vertical sticks in place.
- Repeat Step 1 and 2 only this time leave 3/4' to the left of the 1st stick and 3/4" to the right of the second stick. - If done correctly, you will have a piece of stick approximately 2 5/8" remaining below the 10 sticks and 1/2" piece above the sticks. The 2 5/8" piece will be the legs. Remove the masking tape. Place the 2 panels aside for now.
- Now we need to make the two ends. Start by making a template out of cardboard, cardstock, craft foam or whatever you have on hand but I'll refer to it as cardstock. The template is a triangle with 2 sides that are 2 1/2" and the third side that is 3 3/4". The easiest way to create this template (or pattern) is to start at one of the corners of the cardstock and measure and make a mark that is 2 1/2" away from the corner in both directions. Then draw a line connecting both marks and that third side should end up being approximately 3 3/4".
- Lay 7 skinny sticks flat on the table touching side by side and laying horizontally.
- Temporarily place a piece of masking tape about 1 1/2" from each end and using your template, draw 2 triangles on this set of sticks. (They should both fit if you draw one triangle then flip the template before drawing the next one)
- Now, you need to glue on the braces. To make the braces, cut 2 pieces of Flat stick that are just under 1 1/2" long and one piece of Flat stick that is 1 3/4" long. You need to do this a 2nd time for a total of 6 braces. With hot glue, glue the longest strip down the center (from point to flat side) and glue one shorter piece on either side of it. Repeat gluing of braces for 2nd triangle.
- Cut out the two triangles with craft snips or very sharp scissors. Remove and discard the masking tape.
- To assemble the manger...........take the large rectangles and with the long sticks (legs) at the bottom, put them together to form a V (do not glue this). While holding it in this position, use the hot glue to glue the triangle piece inside the V close to each end.
If you'd like to stain or paint it, do so now or leave it natural
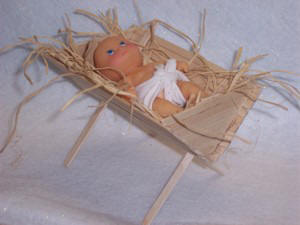
The doll you choose should either be a boy doll or be bald so it doesn't look like a girl. Cut a triangle from white fabric large enough to fit around your doll for a diaper. Tie the 3 corners together in a knot in the front. Take a square of white fabric or a white hankie and wrap it around Baby Jesus as a blanket.
Refer to the directions for using your Manger of Love.