Craft Elf crafts, projects, ideas, patterns, sewing, crochet, knitting and coloring pages Craft Elf

 Craft Instructions, projects, patterns and how to information


Little Bunnies

stitch up Easter bunnies with pattern & sewing instructions from Craft Elf

Sew some Little Bunnies to fill your Easter Basket! Full size pattern and instructions included.

Craft with Food

Fall leaf coaster made from cork and paint
Fall

Tom the turkey can made from a recycled coffee can and craft foam - easy Thanksgiving craft
Thanksgiving

Antler headband craft made from ribbon and craft foam
Christmas

Learn to sew an elf ornament with a free pattern and instructions from Craft Elf
Ornaments

Winter craft project - turn a recycled koolaide container into a snowman
Winter

Step by step cooking and assembly instructions to make a gingerbread house
Gingerbread Houses

Baby shower party favor craft instructions
Party Favors


Learn to sew a sofa door stop weighted with a brick and decorated with a bunny, teddy or other animal
Sewing

Make a picture frame from disposable ashtrays - easy kids craft - great Mother's day craft
General

learn to make airfreshners from teddy bears and wax

Intermediate

free crochet pattern - stuffed octopus
Knit & Crochet

No sew knot wreath made from fabric strips and a recycled coat hanger
Wreaths

Easy kids craft - beaded heart pin for Valentine's Day
Valentine's Day

Easy St. Patrick's Day craft - Pot of gold at the end of the rainbow
St. Patrick's Day


Easy kids Easter craft - Bunny made from Styrofoam balls
Easter

4th of July craft project - Star napkin holder made from Styrofoam
4th of July

Toilet tissue pumpkin - easy kids Halloween craft
Halloween


Hints & Tips
Craft Supplies
Gadget Corner
Sewing Info & Tips


Materials:
  • Two 8" x 4" pieces of fabric (muslin or light weight pastel fabric)
  • 15" piece of 1/4" ribbon
  • Small clear hair elastic or thread
  • Scrap of cardboard
  • Blush
  • Fine tip permanent black marker
  • Craft glue
  • ½" Pompom

1) Trace and cut out two bunny shapes from the fabric.

2) Pin the bunny right sides together and sew around the outside edge leaving an opening of approximately 1 ½" on the bottom for turning and stuffing.


3) Turn right-side out. A chopstick or pencil is helpful to poke inside the bunny while turning.

4) Apply some blush to the center of both ears - on the front side only.

5) Apply blush to cheek area.

6) Slip a piece of cardboard, or several layers of paper, inside the bunny to keep the marker from going thru to the back.

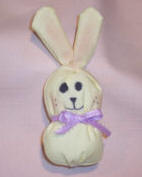
7) Now, make a face being careful to keep it above where the ribbon will be tied (refer to the picture). With black marker, draw eyes, an upside down triangle nose connected to the mouth with a straight line. Also, make three dots on each cheek.  Now you can remove and discard the cardboard

8) Wrap the small hair elastic around the bottom of the ear section or tie this area tightly with heavy duty thread.

9) Stuff the body and hand sew the opening closed.

10) Tie the ribbon in a bow around the middle of the bunny to separate the head and body sections.

11) Glue the pompom to the back of the bunny as a tail.

Suggestion - Make several bunnies and place them in a basket for display.

Printable Instructions & Pattern

Back Easter

Back Sewing 

Home | Coloring Pages | General Crafts | Holiday Crafts | Food Crafts | Party Favors | Crochet & Knit | Sewing | Wreaths | Gadgets | Hints & Tips | Contact Info | Site Map | Links | Privacy Policy