Description
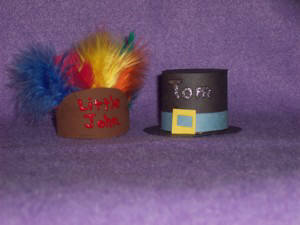
Pilgrim Hat Place Markers/Indian Headdress Place Markers
Fun Kids Thanksgiving craft.
Place markers or place cards are a fun way to show guests where you would like them to sit at the holiday dinner table. Place markers also provide some festive decoration to the table. Kids will love to get in the spirit of the holidays by making these for your Thanksgiving Day celebration! Make one for each guest at your Thanksgiving feast!
Materials and Supplies
Indian Headdress Place Marker
Craft Supplies:
- 6 Feathers
- Toilet tissue tube
- Brown Paint
- Paintbrush
- Tacky glue
- Fabric paint in a squeeze bottle
Pilgrim Hat Place Marker
Craft Supplies:
- Toilet tissue tube
- Craft Glue
- Construction Paper - Black, yellow & light blue
- Silver Glitter Fabric Paint in a squeeze bottle
Craft Instructions
Indian Headdress Place Marker
- Cut the cardboard tube to 1 ½" tall and set the extra piece of tube aside for additional place markers.
- Fold the tube in half and cut the two corners on one end to round them. Doing this will give you two V shapes across from each other. From the lowest point on one of the Vs, cut straight across to the lowest point in the other V but ONLY cut through one layer NOT both. You should now have one side that is higher and rounded and the other side (the back) should be shorter and straight across.
- Paint both the inside and outside brown. Let dry. If needed, give it a second coat and let dry thoroughly.
- Cut the top 1 ½" off the feathers and discard the lower portion.
- Glue the bottom end of the feather tips to the inside of the rounded portion of your cardboard tube.
- Using the paint in the squeeze bottle, write the name of one of your guests on the front of the place marker.
Pilgrim Hat Place Marker
- Cut the cardboard tube to 1 ½" tall. (The tube I used will make 3 hats.) Place the extra tube aside for additional hats.
- Cut a strip of black construction paper big enough to cover the outside of the tube. [My piece was 6" x 1 ½" but keep in mind that different brands of toilet tissue use tubes that are slightly different sizes.] Wrap the construction paper around your tube overlapping the ends and glue in place.
- Trace one end of the tube onto black construction paper. Cut out this circle and glue on top of one end of the tube. This is the top of the hat.
- Cut a 2 ½" circle from construction paper. Use a compass or trace a round object that is approximately the size you want to obtain a nice round circle.
- Glue the bottom end of the tube to the center of this circle to form the brim of the hat.
- Cut a strip approximately ½" x 6 1/4" from light blue construction paper for your hatband. Wrap it around the base of the hat just above the brim and glue in place. Be sure to put the seam on the same side as the seam from the black construction paper. This will be the back of the hat.
- Cut a 5/8" square from yellow construction paper and a 3/8" square from light blue construction paper.
- Glue the yellow square on top of your hatband (the light blue strip). Glue the blue square on top of the yellow square. This forms your buckle. Be sure you glue the buckle on the front of the hat (the side opposite the seam).
- Finally, write a guest's name above the buckle using the glitter fabric paint in the squeeze bottle. Practice on a scrap of paper.
Optional: Make your place marker extra special by filling it with a surprise before you glue the brim on. After dinner tell your guests to look inside their hats.
Place markers or place cards are a fun way to show guests where you'd like them to sit at the holiday dinner table or at a dinner party. Place markers also provide festive decoration to the table.