Description
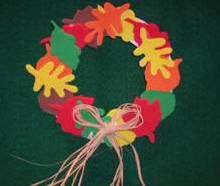
Great Kids Craft and Great Craft for Cub Scouts and Girl Scouts. Inexpensive, simple and fun craft! Print complete craft instructions for this Fall wreath today and enjoy it for Halloween and Thanksgiving.
Materials and Supplies
Craft Supplies:
- Approximately 16 pre-cut craft foam leaf shapes (each about 2" long) Our leaves were purchased from ww.orientaltrading.com
- 14" piece of raffia or pre-made raffia bow
- 7" Paper plate *
- Brown Crayon
- One twist tie or one 4" piece of chenille stem (pipe cleaner)
- Masking tape
- Craft Glue (school glue is too watery and will make the project more difficult)
* It is ok if there is a design on the plate as we will be using the back of the plate.
Craft Instructions
- Cut the rim off the plate. You are then left with a circle that is approximately 5 1/4" across.
- Cut out a 3 1/4" hole in the middle of the circle to make a wreath shape. [I find the easiest way to do this is to find something around the house that is approximately that size and trace it - then cut it out. For this project I used a ribbon spool to trace but often times kitchen items such as cups work well.]
- The back side (or un-coated white side) will become the front of your wreath. Color this entire surface with your brown crayon. This is incase any spots show thru when you put your leaves on.
- On the other side, you will need a hanger to hang it up when you are done. Twist the ends of a twist tie or chenille stem together to form a loop. Tape the twisted ends to the back of the paper plate (the printed side).
- Decide how you would like your leaves arranged on your wreath then glue them in place being sure that the hanging loop is at the top. An easy way to glue on the leaves is to spread the glue on the cardboard circle - you will be putting the glue on top of where you colored. Then, place your leaves directly on the glued area. Put glue directly on the back of the leaves you will be putting on top of this base row.
- Make a bow from the raffia and glue it on to your wreath.
**If you use larger leaf shapes, you can make a bigger wreath simply by using a larger size paper plate.
***If you are making a larger wreath and cannot find larger pre-made leaves, find some real leaves in shapes you like and use them as templates to cut the large leaves you need from craft foam.