Description
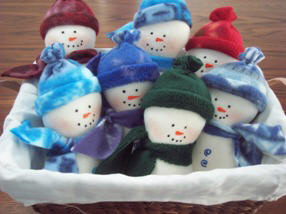
Sew a snowman who won't melt when the temperatures rise. This little guy is perfect as a stocking topper or make a bunch and display them in a holiday basket by the fireplace - remember, they won't melt. We have included a full size snowman pattern and complete sewing instructions.
Materials and Supplies
Craft Supplies:
- White fleece; 9" x 10"
- Colored fleece for hat & scarf; 6 1/2" x 4 1/2" and 2" x 14"
- Powdered blush
- Sewing machine and/or needle & thread
- Polyester Fiberfil (stuffing)
- fabric paint - black, orange, color of your choice for buttons
- Small clear hair elastic or piece of string
Craft Instructions
- Trace and cut out two snowman shapes from the white fleece. When cutting out be sure the stretch of the fabric goes across the width of the snowman not the length. This way you will have a shorter fatter snowman instead of a long skinny one.
- Sew all the way around the snowman shape using 1/4" seam allowance and leaving a 1" opening for turning and stuffing.
- Clip curves, right side out and stuff your snowman with the Polyester Fiberfil. Hand-stitch the opening closed. Place aside for the moment.
- Cut a 2" x 14" piece of fleece for the scarf and tie it around the snowman's neck. Cut the ends on an angle for a more professional finish.
- Cut a 6 1/2" x 4 1/2" rectangle from fleece for the hat. Fleece stretches in one directions so when you cut out the hat, it should stretch in the 6 1/2" direction.
- Fold the hat piece in half so the 4 1/2" ends line up. Stitch across this 4 1/2" end. This will form a tube. Right side out the tube. Gather one end of the tube and wrap a little clear elastic around it. If you don't have a small clear elastic, tie it securely with a piece of string or crochet thread.
- Fold the bottom of the hat up forming a cuff and put the hat on the snowman's head.
- Apply powdered blush to the cheek areas. Using the black fabric paint, make two dots for eyes and 5 or 6 dots for the mouth. To make the nose, use orange fabric paint and starting halfway between the eyes and mouth start squeezing out the fabric paint then release pressure and pull away. I recommend practicing on a piece of paper towel or foil before actually painting on the snowman.
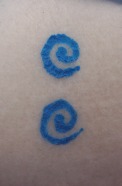
- To make buttons on the snowman, choose a color of fabric paint and draw a swirl as pictured starting at the center of the swirl and work outward.