Description
Our cork coasters will make a fun and festive touch when serving coffee, tea or hot chocolate on Easter morning. Get the kids involved by letting them paint the coasters. Mom or dad or some other adult should cut the shapes out of the cork for safety reasons. Includes full size Easter patterns.
Materials and Supplies
Craft Supplies:
- 3/8" (5mm) thick cork; 6" x 5" piece per coaster
- Craft knife
- Ball point pen
- Black permanent marker; fine tip
- Paint brush
- Paint for bunny - brown and pink acrylic paint
- Paint for Egg - yellow, orange, blue, pink and purple acrylic paint
Patterns for both the bunny and egg can be found on the printable page.
The directions for both the bunny and the egg are the same except for the actual painting.
Craft Instructions
- Trace the shape you want onto a piece of cork using a ball point pen.
- With a craft knife, cut out your shape from the cork. If you angle your knife slightly (instead of using it straight up and down) as you cut you will achieve an angled edge which gives a nice professional look. Caution: cutting should be done by an adult.
- Painting:
To paint the bunny:
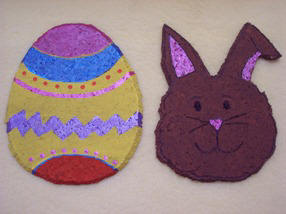
- With pink paint, paint an upside down triangle in the middle of the bunny's face. Also, paint the center of the ears with pink paint as pictured.
- Paint the rest of the surface of the bunny head and ears brown. Paint the sides of the coaster brown. Let dry completely.
- Using a black permanent marker, outline the areas you painted pink then draw a mouth, whiskers, eyes and eyebrow. Finally, outline the whole bunny head.
To paint the egg:
- First, use a ball point pen to draw lines dividing the egg into four sections as indicated on the pattern. Also, draw two zigzag lines inside the largest section of the egg. When painting the egg bring the colors from each section down to the sides so the sides are painted the same color as the surface. The underside or bottom of the coaster does not need to be painted.
- Paint the largest section yellow painting right over the zigzag lines. It may need two coats of paint but let it dry completely before applying the second coat of paint.
- Paint the bottom section orange
- Paint the top section pink.
- Paint the remaining section (the one between the pink and yellow) blue. At this point, let the egg dry completely before proceeding.
- Using the purple paint, paint the section between the zigzag lines.
- Using blue paint, paint a thin line where the orange and yellow paint meet.
- Paint a thin yellow line where the pink and blue sections come together.
- Paint a medium thick pink stripe across the yellow about 1" down from the blue section
- Make a row of orange dots across the yellow section between the blue section and the pink stripe. To do this, dip a paintbrush handle into orange paint and touch it to the coaster. Re-dip after each dot.
- Use the same procedure to make a row of pink dots across the yellow section just above the orange section.
Note: It is not recommended that you use these coasters with sweaty drinks as the water could seep through or bead off the cork.