Description
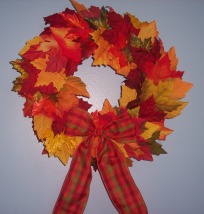
This simple fall wreath can be made quickly with no gluing*. It is made from a Styrofoam wreath and silk fall leaves and don't forget some pretty fall ribbon for a bow.
Materials and Supplies
Craft Supplies:
- 10" Styrofoam wreath form
- 2 Yards of 2 1/2" wide ribbon
- 16 - 18 Small common pins with silver heads
- Assorted fall leaves
- 8" Wire
- Wire cutters
It is important to choose the type of Styrofoam wreath which is soft and porous so you can poke the leaves into it. The type of wire I used was 28 gauge cloth covered stem wire but many types of wire will work so try using what you have on hand. Also, the ribbon I used was wire edged and works quite nicely.
Craft Instructions
1) Cut your wire so you have one 6" piece and two 1" pieces. With the 6" piece, form a loop and twist the ends together. Poke the twisted end into the Styrofoam approximately 1" from the outer edge on the backside of the wreath and fold the loop towards the outer edge. To help secure the loop, fold each of the 1" pieces in half and stick them into the Styrofoam so that they straddle the wire of the loop and place one on either side of where you attached the loop.
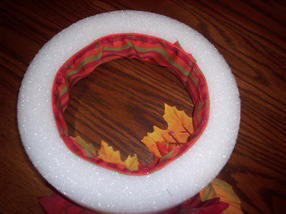 2) Cover the inner circle of the wreath with ribbon as shown using common pins to secure it to the wreath form. Cut the ribbon long enough so that it can overlap by 1 1/2" and fold the raw end under before pinning it in place.
3) Cut a variety of leaves off their bunches leaving about 1/2" of the stem attached.
4) Lay the wreath on your work surface so that the hanger is face down (against the work surface). Start attaching the leaves to the wreath by poking the end of the stem into the wreath form. Continue adding leaves to the front and side surfaces overlapping them as you go so there is no Styrofoam showing.
5) Make a bow with the remaining ribbon. Attach it to the wreath with two common pins stuck through the ribbon in an inconspicuous spot such as inside the knot of the bow. When attaching the bow, be sure the hanger is at the top of your wreath. Trim the ends of the ribbon to your desired length. To make a nice finished edge either cut the ends at an angle or fold the ends in half lengthwise and cut on an angle starting on the outside and going higher as you cut toward the folded edge. This will form a v shape in the ribbon when you unfold it. For a different look try replacing the cloth bow with a bow made from raffia.
Optional: Before starting, paint the Styrofoam with a fall color (red, orange etc) so that if any spaces show through they will not be as noticeable.
* If you plan on hanging your wreath where there will be a lot of wind you might want to dip each stem in tacky glue before inserting it in the Styrofoam wreath.