Description
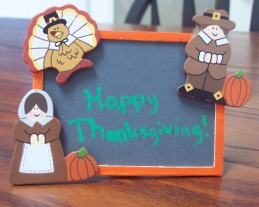
Craft this simple but unique Thanksgiving decoration to display on a desk, end table or shelf. Also makes a great teacher's gift or hostess gift. Easy kids craft.
Materials and Supplies
Craft Supplies:
- 3" x 4" Blackboard
- Green paint pen
- Orange acrylic paint
- Paintbrush
- Tacky Glue
- 3 Pre-finished wood Thanksgiving shapes or unfinished shapes and paint or markers to decorate them yourself
- Craft paddle or Wide craft stick or Thick cardboard
- Craft knife
Craft Instructions
- Using the orange paint, apply two coats of paint to the wooden border of your chalkboard letting it dry completely between coats.
- Go directly to step 3 if using pre-finished wooden shapes. If you are using unfinished wooden shapes, finish them now as desired with paint or markers. Let dry completely.
- Lay the Thanksgiving shapes on the edges of your chalkboard and when you are happy with the layout, glue them in place with tacky glue.
- Using a green paint pen, write Happy Thanksgiving on the chalkboard area.
- Now it's time to make a stand:
Option 1 - Cut a piece of sturdy cardboard measuring 3/4" wide x 3 1/4" long. Make a fold line approximately 1" from one end and glue the top 1" to the back of your completed slate with tacky glue. Let dry completely before standing up your Thanksgiving sign.
Option 2 - Cut 3 1/4" off one end of a wooden craft paddle or a wide craft stick. About 1" from one end, score a line half way through the stick allowing you to bend the stick on this line. Glue the top 1" of the stick to the back of the sign as pictured with tacky glue and let dry completely before standing up your sign.