Description
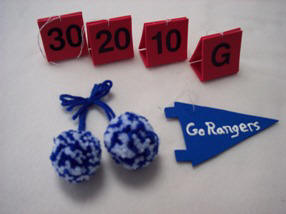
Pompoms, Yardage Markers & Pennants
Craft these Pompoms and Pennants in your team's colors and add them to your Christmas tree along with our other football ornaments for a football themed holiday tree. This set of ornaments is made of craft foam and yarn.
Materials and Supplies
Pompom Ornament
Craft Supplies:
- Worsted weight yarn in two colors
- Scissors
- Using both colors at the same time, wrap the yarn around three of your fingers forty times.
- Cut the yarn off the skein and slide the wrapped yarn off your fingers.
- Using a piece of yarn approximately 20" long, tie it securely in a knot* around the center of your wrapped yarn.
- Trim the pompom so that it is neat looking but be sure not to cut the long string that you tied it with. Don't worry if it seems you are taking a lot of yarn off when you trim.
- Repeat steps 1 - 4 to make a second pompom then tie the two pompoms together in a bow. You can now hang them on the tree by the connecting strings.
*When you wrap the yarn around to tie it, tuck it under twice before pulling tight and completing the knot. It will stay much tighter this way.
Craft Instructions
Pennant Ornament
Craft Supplies:
- Craft foam
- Elastic thread and needle
- Fabric paint in squeeze bottle
- Trace the pennant pattern onto the craft foam and cut it out.
- Using a needle, thread a 7" piece of elastic thread through the top of the pennant and knot the ends together to form the hanger.
- Using the fabric paint write your message on the pennant. We wrote "Go Rangers". Let dry completely before hanging on your tree.
Side Line Marker Ornaments
Craft Supplies:
- Red craft foam
- Clear packing tape
- Elastic thread and needle
- 1" black letter and number stickers, you'll need four G, nine 0s, two 1s, two 2s, two 3s, two 4s and one 5 or you can use black fabric paint in a squeeze bottle
- One of the following: Scissors, or a rotary cutter or craft knife with a cutting mat and straight edge
Each set of markers should include 11 markers as in a real field but make as many as you wish.
For each marker:
- Cut out two 1 3/4" squares and one 1" x 1 3/4" rectangle from red craft foam. Tip: If you have a rotary cutter or craft knife you can use it with a straight edge and cutting mat to make a nice straight edge. The straighter your edges the more professional looking your ornaments will be.
- Lay the two squares flat on your work surface with the rectangle between them. Be sure they are lined up evenly then, tape the two seams that are touching using the clear packing tape.
- Put a piece of clear tape on one of the ends letting it extend beyond the craft foam. Fold the craft foam into a triangle so that the tape is on the inside of the triangle and using the extending tape, attach the two loose ends together.
- Using the needle, thread the elastic string through the top of the triangle going through two layers of craft foam. Remove the needle and make one knot close to the triangle. Then knot the two ends together.
- Stick one G sticker in the center on each side of the triangle.
Repeat steps 1 - 4 ten more times for a total of eleven markers. Make one marker with a 50 on each side then make 2 markers each of G, 10, 20, 30, 40