Description
Our original snow globe is an easy kids craft and fun way to get into the holiday spirit. It's crafted inexpensively from construction paper and a plastic plate. Easy kids craft idea.
Materials and Supplies
Craft Supplies:
- 7" Clear plastic plate
- Blue construction paper
- Red construction paper or cardstock
- Glue stick
- Hot glue gun and hot glue sticks
- 1/8 cup Glittering snowflakes
- Twist tie
- Stapler
- Crayons, markers
- stickers - optional
Craft Instructions
- Trace and cut one snow globe base from red construction paper or cardstock.
- Trace and cut one snow globe from blue construction paper.
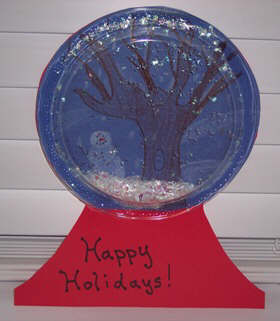
- Draw a winter scene on the blue globe with crayons. I drew a bare tree with snow on the branches, a snowman beside the tree and snowflakes but feel free to make your globe picture original. Set aside for a moment.
- Take the twist tie and fold it in half forming a loop then twist the ends together. Now, staple it to the back of the snow globe base being sure it is near the top of the globe with the loop at the top. Fold the ends up over the staple so the twist tie doesn't slip off. The twist tie is now your hanger.
- Using a glue stick (not the hot glue) glue the blue globe (circle) on top of the red circle on the base.
- Place the plate flat on your work surface and put an 1/8 cup of glittering snowflakes in the center.
- Run a bead of hot glue* around the rim of the plate, then lay the snow globe on top of the plate so that the blue circle is in the center of the clear plate. Press the edge of the plate firmly against the snow globe before the glue dries.
- Flip your globe over and write a message such as "Happy Holidays" or "Season's Greetings" on the globe base as pictured. If desired, you can also decorate the base with stickers or markers.
*This should be done by an adult.
Suggestion: You can adapt this snow globe to use a larger plate such as an 8 1/2" plate.