Description
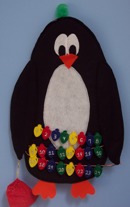
Count down to Christmas with our original Penguin Countdown. He makes a great decoration and helps the family keep track of how many days left until Christmas.
Materials and Supplies
Craft Supplies:
- Felt Black 1 yard of 36" wide
- Felt Orange 12" x 4"
- Felt White 13" square
- Felt 5" Square of each yellow, red, green and blue
- Foam 24" x 13" x 1/4" thick
- 40" cording
- 5 White Pipe cleaners (chenille stems)
- One feather
- 1" O ring
- Christmas fabric 2 pieces 5 1/4" wide x 6" high
- Silver glitter fabric paint
- Hot glue gun & glue sticks
- Tacky glue
- 12" Thin ribbon
- Sewing machine
- Sewing needle
- Thread white & black
- Optional: Sizzix System- Die Cutting Machine
with Sizzix Sizzlits Singles Die-Small Christmas Lights
To Use:
Starting December 1st, each day add a light bulb to the empty string starting with #24 and counting backwards. This way you will know how many days until Christmas.
Craft Instructions
1) Cut 24 pieces of pipe cleaner each 2 1/4" long. Set aside.
2) Trace and cut out or use your Sizzix System- Die Cutting Machine to cut out 6 light bulbs each from the yellow, red, blue and green felt for a total of 24. If you are cutting them by hand, you can omit cutting the little hole in the bulb if it is too difficult
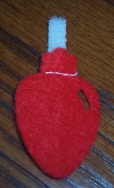
3) Before you start this step, I want to caution you to be sure that the little cut out in the bulb is on the same side of all your bulbs when you attach the pipe cleaners. To attach the pipe cleaner, *Lay one of the 2 1/4" pipe cleaners on top of one of the felt light bulbs with 3/4" of the pipe cleaner extending above the top of the light bulb. Stitch across the pipe cleaner three times at the spot where the bulb and the top come together as pictured. Then, using your hot glue gun, glue down the piece of pipe cleaner that is below the stitch line. Repeat from * for each of the other 23 bulbs.
This photo shows where the stitch line should be.
|
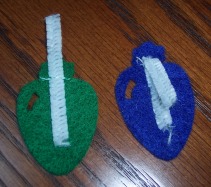
This photo shows the back side of the light bulbs. As pictured on the green bulb, glue the pipe cleaner below the stitch line to the felt. Then as shown on the blue bulb, fold the top of the pipe cleaner down forming a hook. |
4) Using the glitter fabric paint, draw the numbers 1 through 24 on the light bulbs alternating the four light bulb colors as you go. Set aside to dry. Once dry, fold the top of the pipe cleaner down forming a hook.
5) Trace and cut out the following pieces:
- Foam - one body insert
- White felt - one belly and one each of the 2 eyes
- Orange felt - one beak and two feet
- Black felt - two body pieces, two inner eyes and two each of the two wings
6) Pin one pair of wings together and sew around the perimeter using 1/4" seam allowance. This does not get stuffed so just stitch all the way around. Repeat for the second pair or wings. Set both pair aside.
7) Lay one black felt body on your work surface. Lay the two orange feet at the bottom (the wider end) of the penguin body so that the straight edge of the feet is on top of the body piece and the actual feet are hanging off the body. Center the foam body insert then cover the foam with the second black body piece. Pin in place making sure you pin the feet in place. Top stitch all the way around 1/4" from the raw edge and when you get to the top of the penguin slip the end of a feather between the layers just before you sew that spot. Note: The straight edge of the feet should be sandwiched between the body layers with the remainder of the feet hanging out.
8) Place the white belly piece on the penguin as pictured and pin in place. Set your sewing machine up with black thread in the bobbin and white thread on top. Top stitch around the belly close to the edge sewing through all layers.
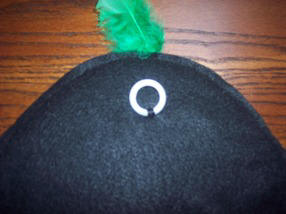 9) Hand stitch the O ring to the back of your penguin by taking several stitches close together at the bottom of the O. The top of the O should be an inch or so below the top of the penguin and centered side to side.
10) Now, make a bag for the lights: Cut two pieces of fabric 5 1/4" w x 6" h. Pin them with right sides together. Starting at the top of one of the 6" sides, sew down 1" then skip the next 1/2" (do not sew here). Resume sewing down this side, across the bottom and up the next side. You should now have 3 sides that are sewn and the top edge should be un-sewn and open.
11) Make a casing at the top opening by turning the raw fabric toward the wrong side 1/4" and pressing then turn it an additional 3/4" and press. You should have folded it twice towards the wrong side of the bag. Stitch close to the first fold you made. This forms a casing that is slightly larger then 1/2".
12) If done properly, there should be a hole in the casing at one of the side seams. Cut a piece of thin ribbon 12" long and attach one end of the ribbon to a small safety pin. Put the pin into the hole and thread it around through the casing and come out the other side. Knott the two ends of the ribbon together and your bag is complete. Place the bag aside for now.
Penguin Assembly:
13) Lay the penguin body on your work surface with the "belly" side facing up. Lay the wings on your penguin just for placement. Do not attach them yet.
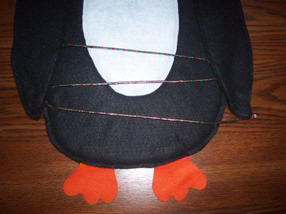 14) Knot both ends of your cording and lay it out on your penguin as pictured being sure there is enough room for the light bulbs to hang below the cording without hitting the bulbs on the next row. Pin in place and temporarily remove the wings. Tack the cording at the beginning and end of each row with either a needle and thread (my preference) or hot glue.
15) Place the wings back on your penguin and when you are happy with the placement, hot glue them in place where they overlap the body.
16) Using tacky glue, attach the eyes and the beak as pictured. One eye should slightly overlap the other eye. Then glue the black parts of the eyes on top of the whites.
17) Hot glue or stitch one end of the bag's string to the back of one wing.
18) Place all of the light bulbs in the bag.