Description
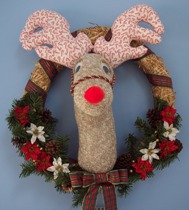
This unique reindeer wreath is a festive holiday decoration and is fun to make with our free craft instructions.
Materials and Supplies
Craft Supplies:
- Straw Wreath
- Polyester Fiberfil
- 1 Man's wool sock
- 1/3 yard Fabric
- Greenery (I used part of a garland)
- Artificial flowers
- Pinecones
- 1 yard Decorative cording
- 46" length of ribbon 1 1/2" - 2 1/2" wide
- Sewing machine
- Needle & thread
- Hot glue gun and glue sticks
- 30mm googly eyes
- 1 1/2" Red pompom
- 1 pair Fake eyelashes
- Small amount of beige felt
- Tacky Glue
Optional: Other items to decorate the greenery such as gift packages, berries, etc.
Craft Instructions
- Trace and cut out two pair of antlers.
- With right sides together, pin one pair of antlers together. Sew 1/4" from the edge leaving the bottom open. Repeat with the second pair.
- Clip curves and turn each antler right side out.
- Stuff both antlers firmly and set aside. The bottom should still be open at this point.
- Stuff the sock. Be sure it's firm. Hand stitch the opening closed.
- Bend the sock at the heel and bring the toe down to the straight leg portion of the sock. *Hand stitch it in place as pictured (the stitches should be about 2 1/2" - 3" from the toe)
- Now, sculpt the sock where they eyes will be. To do this, thread* a long needle and knot the end of the thread. Determine where the base of each eye will be and stitch by placing the needle into the sock where the base of the first eye will be going through the inside of the stuffed sock and coming out where the base of the second eye will be. Stitch back and forth in this manner several times pulling taught after each stitch. Knot securely and cut off the excess thread.
- Hand stitch the antlers to the reindeer head as pictured. To do this, fold the raw edge of the antler fabric to the inside of the antler and pin in place while you stitch. You might find it helpful to make four or five stitches where the antlers touch to keep them together.
- Using a common pin, attach one end of the ribbon to the back of the straw wreath. Wrap the ribbon securely around the wreath. Once you get back to where you started, cut off the excess ribbon and attach this end with a common pin.
- One at a time, temporarily remove each of the common pins and apply some hot glue between the ribbon and the wreath and reinsert the pin.
- Lay your reindeer head on the wreath as pictured. Be sure the head is centered in the wreath. Using the hot glue gun, attach the antlers and the bottom end of the reindeer to the wreath.
- Dip the tip of one end of the cording in glue to prevent it from unraveling. Set aside and let dry completely.
- Cut 2 ovals from the beige felt using the pattern provided. Using tacky glue, attach one end of each oval to the spot you sculpted on the reindeer head. Glue a googly eye on top of each beige oval as pictured using tacky glue. Then, attach the eyelashes on top of each eye. The easiest way I found to do this is to apply a thin bead of tacky glue to the top edge of the googly eye then press the eyelash into the glue. You might have to hold it in place for a minute.
- Now, attach the cording. Hot glue the end of the cording to one side of the snout. Then, go under the snout and back up around with the cording to where you started. Hot glue the cording in place where it comes together with the beginning point. Bring the cording up behind the antlers and back down to the other side of the snout, opposite where you started. Cut off the extra cording and glue the end under the cording that goes around the snout. Use the hot glue to tack the cording in 3 or 4 places so it doesn't move around.
- Glue a red pompom onto the snout as pictured.
- To decorate the wreath, cut some greens and lay them on the wreath. When you are satisfied with their layout, hot glue them in place.
- Make a bow and hot glue it to the base of the reindeer. To make the bow pictured, cut one piece of ribbon in each of the following lengths: 15", 16", 9" and 2 1/2". Fold the center of the 16" piece into a v shape and glue the point of the v upside down at the base of the reindeer. With the 15" piece and with the right side facing out, bring one end around to the other end - overlap the ends and glue together. Repeat with the 9" length. Center the smaller loop on top of the larger loop. Then, use the 2 1/2" piece of ribbon and wrap it around the center of the two loops having the two ends overlap on the back side of the bow. Trim if necessary and hot glue the ends together. Hot glue this piece on top of the v shaped ribbon which is already attached to the wreath. Trim the ends of the v shaped ribbon at an angle for a more professional look.
- Finish decorating the wreath by placing flowers, pinecones and other decorative items on the greenery. When you are happy with the layout, hot glue everything in place.
* It is helpful to use a strong thread such as button thread so it doesn't snap when you pull it.