Description
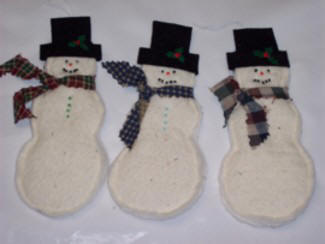
Make a cool snowman ornament to add to your holiday decorations! Full size pattern and instructions to paint holly leaves included.
Materials and Supplies
Craft Supplies:
- 2 pieces 6 ½" x 4" warm & natural batting
- one 12" x 3/4" piece plaid fabric
- one piece 6 ½" x 4" polyester batting
- 2 pieces 2" x 2 ½" black felt
- Fabric Paint, red & green
- Craft glue
- 7" piece crochet or elastic thread
- seed beads, 7 black, 1 orange & 4 green or color of your choice
- Thread
- Sewing machine or needle
Craft Instructions
- Cut out two snowmen from warm & natural batting and one snowman from polyester batting. The easiest way to do this is to sandwich the polyester batting between the 2 layers of warm & natural batting, trace the snowman once, pin the snowman together through all 3 layers then cut out.
- Sew all the way around the outside edge (close to the edge) of the snowman.
- Sew 4 seed beads down the front as pictured for buttons.
- On the top ball section, sew on one orange bead as the nose and then sew on the black beads for the eyes and mouth.
- Trace and cut out 2 hat pieces from black felt.
- At the top of the snowman, glue one hat section to the front and one to the back of the snowman being sure both hat pieces line up with each other.
- Tie the 3/4" x 12" piece of plaid fabric around the snowman's neck as a scarf.
- With green fabric paint, draw three holly leaves on the hat and put 3 red cots in the center of the leaf cluster. Attached you'll find a step by step diagram for drawing the holly. If you have trouble with this or if it's not quite your style, you can eliminate the holly and glue a thin strip of fabric or piece of thin ribbon around the hat to form a hatband instead.
- Once the hat is dry, thread a piece of crochet thread or clear elastic thread through a needle and pull through the back of hat. Remove needle and tie ends in a knot. This is your hanger.