Description
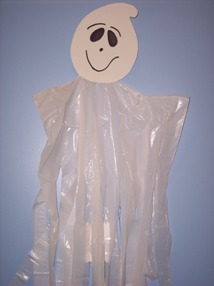
This ghost windsock makes a hauntingly good decoration. It's an easy kids craft so why not make several to hang from your trees to help haunt your yard this Halloween.
Materials and Supplies
Craft Supplies:
- 2 Sheets white craft foam
- 1 Wire coat hanger
- 24" or longer piece of string
- Hot glue gun and hot glue sticks
- Tacky glue - optional
- Black permanent marker
- White trash bag - tall kitchen size
Craft Instructions
- Trace and cut out 2 ghost heads from white craft foam.
- Lay the hanger flat on your work surface and bend the two bottom corners of the hanger upward. These will represent the ghost's arms.
- Slide the bottom of the trash bag over the top of the hanger. The bag will be upside down. Poke the hook of the hanger through the center of the bottom of the bag
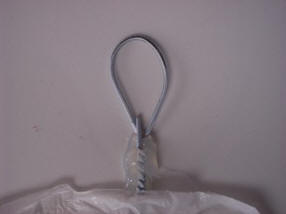
- Bend the hook of the hanger to form a loop.
- Using your hot glue gun, glue the straight part of the hanger (the part just below the loop) to the back of one of the head sections as pictured. Be sure not to glue the loop.
- Use a couple dots of hot glue or some tape to secure the edge of the plastic bag to the back of this head section.
- Tie one end of the string to the loop on the hanger. Lay the rest of the string flat on the ghost head so that the loose end comes out and extends past the top of the head.
- Using tacky glue, glue dots or your hot glue gun; glue the two head sections together sandwiching the hood in between them. Be sure that the string is coming straight out of the top of the head.
- Draw a face on one side of the ghost's head.
- Starting at the bottom of the ghost, cut the bag into strips that are approximately 2" wide. Stop cutting about 3 or 4 inches before you get to the bottom of the hanger.
Your ghost is not ready to haunt your house. Simply use the string to tie him wherever you would like him.