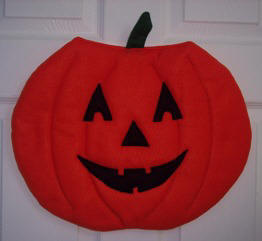
Description
This easy sewing project turns ordinary felt into a special Halloween decoration. We have provided the full size pattern to help you make a Jack-o-Lantern for your home.
Materials and Supplies
Craft Supplies:
- Orange felt - 2 pieces 17" x 20" each
- Black felt - 8" square
- Green felt - 4 1/2" x 3"
- Batting 17" x 20"
- Sewing machine
- Thread - orange, black & green
- O ring
- Fabric marker or pencil that washes out*
*These are sold under many names such as "Mark-B-Gone" and "Washout cloth marker". The important thing is that somewhere on the packaging it states it is water soluble or washes out.
Craft Instructions
- Trace and cut out two pumpkin shapes from orange felt and one pumpkin shape from batting.
- Trace and cut two stem pieces from green felt.
- Trace and cut out one mouth, one nose and two eyes from black felt.
- Trace the four lines onto the right side of one of the felt pumpkins using your fabric marker. Then pin the batting to the back side of this piece.
- Using orange thread, top stitch over the lines you marked on the orange felt sewing through the batting as you do so. This is the front or face of your pumpkin.
- Lay out the eyes, nose and mouth on the front of your pumpkin. Pin them in place. Top stitch around each of these shapes using black thread.
- Pin the two stem pieces together and sew around using a 1/4" seam allowance and keeping the bottom open. Trim the corners and right side out. Place aside for the moment.
- Place your second pumpkin piece on top of the one with the face so that the face is sandwiched between the two layers. Pin in place.
- Stitch around the pumpkin using 1/4" seam allowance and leaving the top open.
- Clip curves. Trim batting close to the seam. Right side out.
- Fold the top 1/4" or so to the inside of the pumpkin and slip the bottom of the stem between the two layers. Pin in place. Then, top stitch across the top of the pumpkin using orange thread and stitching the stem in place as you go.
- Hand stitch an O ring to the back of your pumpkin to be used as a hanger.
Hint: 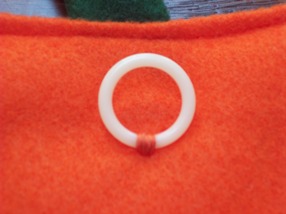
*For a more professional look, use an iron to press the edges all the way around the pumpkin.
* If there are any marks remaining on the front of your pumpkin from when you drew them, follow the manufacturers directions for removing them or use a damp cloth to wipe them off. Read the instructions, some markers just fade after 24 hours.
You will need Acrobat Reader to view the pattern as it is a PDF. |
| Printable Instructions | ||
|
||
| Back to Halloween | ||
| Back Sewing | ||
| Back Intermediate |