Description
If you like to craft with wood and fabric, this simple spring project is a perfect choice.
Materials and Supplies
Craft Supplies:
- 1/2" Plywood; a 2' x 4' piece will make two bunnies
- Jigsaw
- Primer
- White paint; acrylic or latex
- Acrylic paint - pink, black & green or blue
- Paint brushes
- Drill with a 3/4" bit
- 1" white pompom
- Wood Glue
- Hot glue gun with glue sticks
- Picture hanger
- Fabric; 2 piece 14" x 4 1/2"
- Thread
- Common pins
- Sewing machine or hand sewing needle
- Polyester Fiberfil (stuffing)
- Ribbon; one 12" piece of 1/2" wide or three 12" pieces of 1/8 -1/4" wide
- Sandpaper
Craft Instructions
- Trace one head, one body and two feet onto the plywood.
- Cut out the shapes with a jigsaw.
- Drill a hole in each foot about 1/2" from the heal end and centered side to side.
- Drill two holes at the bottom of the body - one hole where each X is marked.
- Sand any rough edges.
- Prime all four wooden pieces. Let dry completely.
- Apply one or two coats of white paint to the wooden pieces letting the paint dry completely between coats.
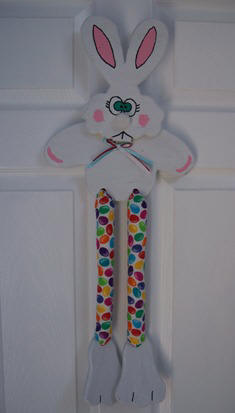
- Using pink paint, paint the inside of the bunny's ears, the cheeks and the tips of the bunny's hands. Refer to the photo.
- Using the black paint, outline the pink centers of the bunny's ears. Also paint two black ovals for eyes so that the ovals are touching.
- Paint a green (or blue) circle inside each of the ovals. Then outline the green circles with black paint and make a small black circle inside each of the green circles.
- Paint three black eyelashes on each eye and paint mouth/teeth as shown.
- Paint two lines approximately 3/4" long on each foot to define where the bunny's toes are.
- Once all the paint is completely dry, use wood glue to attach the bunny's head to his body.
- Using hot glue, glue the pompom on the bunny's face between the eyes and mouth as a nose.
- Tie the 1/2" piece of ribbon in a bow or hold three pieces of narrow ribbon as one and tie that in a bow. Hot glue to the bunny just below the bunny's head.
- Cut two pieces of fabric 14" x 4 1/2".
- Fold one of the pieces of fabric in half lengthwise with right sides together. Pin in place. Using a 1/4" seam allowance, stitch along the long side leaving the ends open. Right side out. See our sewing tips for turning a tube of fabric.
- Stuff the tube with stuffing (Polyester Fiberfil). Leave 1 1/2" unstuffed on each end. It is helpful to use a pencil or chopstick to push the stuffing into the center of the tube.
- Repeat steps 17 and 18 with your other piece of fabric to make a second leg.
- Slide one end of one of the legs through the bunny's body from front to back and glue in place on the back side with hot glue.
- Repeat step 20 with the second leg.
- On the other end of each leg, thread the leg through the hole in the foot from the top (right side) of the foot to the bottom (backside) of the foot and hot glue in place.
- Nail a picture hanger to the backside of the bunny's body.