Description
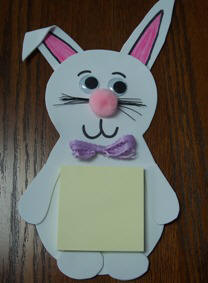
Kids will love making this Easter bunny craft from craft foam and hanging it on the frig.
Materials and Supplies
Craft Supplies:
- 1 Sheet white craft foam
- Two 20mm googly eyes
- Magnet; 1 1/2" x 1" (or two smaller pieces)
- Markers, pink and black
- Tacky glue or hot glue gun with glue sticks
- Pink pompom, 1"
- Black button thread
- Thin Ribbon
- Pad of Pot-it notes
When you run out of paper on your completed project, simply glue a new Post-it pad onto the bunny's belly.
Craft Instructions
- Using the pattern provided on the printable page, trace and cut out one body/head piece, two arms, two ears and two feet.
- On one side of each ear, color the center pink and outline it with black marker.
- Glue the bottom edge of the ears to the back of the bunny's head (near the top). Be sure the side you colored is facing the front of the bunny.
- Fold over the top of one of the ears and glue in place as pictured. If you are using tacky glue, it may be helpful to use a clothespin to hold it in place until the glue dries.
- Glue the pad of Post-its to the bunny's belly leaving enough room on either side for an arm and leaving room underneath for the feet.
- Glue the arms and feet on as pictured.
- Cut several strands of button thread 4 1/2" long. Holding them as one strand, tie a knot in the center to hold all the strands together. Glue the knot to the center of the bunny's face. Then, glue a pink pompom on top of the knot.
- Glue the googly eyes above the nose/whiskers. Draw eyebrows and a mouth with a black marker.
- Glue a bow in the neck are and attach the magnets to the back of the bunny.
Once everything is dry, hang your bunny on the refrigerator or any other metal surface.