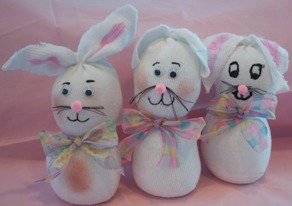
Description
This project will appeal to all ages but children and the elderly will especially have fun making sock bunnies for Easter or anytime. Quick and easy!
Materials and Supplies
Craft Supplies:
- One sock*
- 24" Ribbon
- White yarn or string
- Two 10mm googly eyes
- Polyester fiberfill (stuffing)
- Poly pellets or rice 1/2 cup
- Blush, pink paint & a paint brush or a crayon
- 1/4" Pink pompom (nose)
- Black button thread
- Black fabric paint in a squeeze bottle or black permanent marker
- 1 1/2" pompom (tail)
- White glue
- Optional - 1 bumpy white pipe cleaner and a hot glue gun
* The size of your sock will determine how big your bunny is. If the sock is bigger than you need, you can always cut the top to get a smaller bunny. Our sample used a ladies crew sock.
Craft Instructions
- Pour about 1/2 cup Polly pellets or uncooked rice into a sock.
- Add Polyester fiberfill to your sock until it is the size you want the body of your bunny to be.
- Using a piece of yarn or string the same color as the sock, tie the sock closed just above the stuffed area.
- Start adding more stuffing (fiberfill) to the sock above where you tied it. This will be the head.
- Once the head is the size you want, tie it off with string or yarn.
- There should still be more sock above the head which will be used to make the ears. Cut down the center of the portion of sock remaining above the head - dividing it in two.
- If desired, trim the two ear pieces into an ear shape by cutting off and rounding the corners.
- To color the center of the ears, the belly and the cheeks either brush with blush, color in with a pink or rose crayon or brush on some fabric or acrylic paint.
- Tie a ribbon around the neck between the head and body.
- Glue the 1 1/2" pompom to the back of the bunny for a tail
- Cut several strands of button thread to 3" long. Hold the strands together as one and make a knot in the center of the strands. Trim. These will be your bunnies whiskers.
- Glue the knot in the whiskers to the center of the bunnies face and glue a 1/4" pompom on top of the knot for a nose.
- Glue on googly eyes above the nose and whiskers.
- Using fabric glue in a squeeze bottle or a black permanent marker, draw a mouth and eyebrows.
- Feet are optional - if making with small children, either eliminate this step or have an adult do this part. Cut one "bump" off of a bumpy pipe cleaner. Fold the bump in half and hot glue it to the bottom of your bunny for one foot. Repeat for the second foot.
Ideas:
- Try making bunnies out of pastel colored socks.
- Check your local dollar store for cheap white socks.