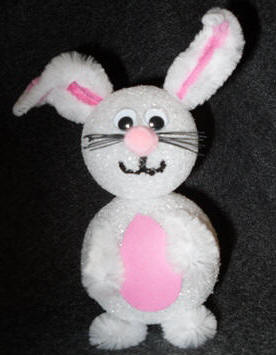
Description
Craft this little critter for Easter or anytime. Mr. Bunny is made from Styrofoam balls and chenille stems. Quick and easy to make. Fun kids craft.
Materials and Supplies
Craft Supplies:
- 2" Styrofoam Ball
- 2 1/2" Styrofoam Ball
- Three white bumpy pipe cleaner (chenille stems)
- One pink regular pipe cleaner (chenille stems)
- Black button thread
- 1/4" pink pompom
- Two 10mm googly eyes
- Pink craft foam or felt - small amount
- Black paint in a squeeze bottle (fabric paint works well) or fine tip black permanent marker
- White glue
- Toothpick
Craft Instructions
- Flatten the bottom of your 2 1/2" Styrofoam ball by pressing it gently against your work surface.
- Dip one end of a toothpick in white glue and stick the toothpick in to the top of the 2 1/2" Styrofoam ball. The 2 1/2" ball is the bunny's body.
- Put a little glue on the other end of the toothpick and slide the 2" Styrofoam ball on to it for the bunny's head.
- Cut an oval or egg shape out of pink craft foam or felt and glue in the center of the body (the 2 1/2" ball) for the belly.
- Using wire cutters, cut one bump off a bumpy pipe cleaner. Fold it in half keeping the center of the bump somewhat rounded. Twist the ends together. Stick the twisted end into the Styrofoam ball on one side of the pink "belly" and bend the pipe cleaner downward. This is one arm. Repeat with another pipe cleaner bump for the second arm.
- The feet are made the same way as the arms except you stick them into the bottom of the 2 1/2" ball. They should be stuck in close to the front so you will see them stick out from under the bunny.
- Make a tail in the same way you made the arms and legs. Stick it in the back of the 2 1/2" Styrofoam ball near the bottom and then bend it upwards. In our sample, we used a larger chenille bump for the tail but either size is fine.
- To make the ears - for each ear - cut a piece of bumpy pipe cleaner so that you have 2 bumps together. Cut a piece of regular pink pipe cleaner to the same length as the 2 bump piece. Fold the pink pipe cleaner in half. Fold the white bumpy piece of pipe cleaner in half around the pink pipe cleaner. (The pink pipe cleaner should be inside the fold of the white one.) Insert the ends of the white and pink pipe cleaner into the top of the 2" Styrofoam ball. Repeat for the second ear. Bend the ears to desired position.
- Cut several strands of black button thread to approximately 2 1/2" or 3" long. Holding all strands together a one, tie a knot in the center of the strands. These are the whiskers. Glue the knot with either white glue or hot glue to the center of the bunny's face. Trim the whiskers. Glue the pink pompom on top of the knot for the nose. Glue two wiggly eyes above the nose. Draw on a mouth with either paint in a squeeze bottle or a black permanent marker below the nose.