Description
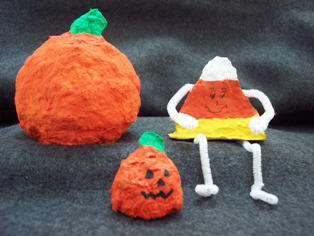
Let your creativity run wild with the many possibilities of Paper Mache'. To get you started, we have two great Halloween Paper Mache' project ideas.
Materials and Supplies
Craft Supplies:
- Instant Paper Mache' product such as Celluclay
- Water
- Balloon
- Two white pipe cleaners
- White glue
- Paint brush
- Acrylic, poster or tempera paint - yellow, orange, white, green and black.
- Optional: Black permanent marker - fine or ultra fine
General: Cover your work surface with plastic wrap or a plastic bag. Read complete instructions that come with your instant Paper Mache'. Make Paper Mache' per instructions. Start with slightly less water than they recommend then add more if needed. Be sure to mix the paper product and water thoroughly.
Craft Instructions
Pumpkins:
- For the larger pumpkin (ours is approximately 4" tall plus the stem), inflate a balloon and knot it. Note: Your finished pumpkin will be just slightly larger than your balloon so inflate it to the size you would like your finished pumpkin to be.
- Cover the balloon with the Paper Mache' mixture adjusting it on the bottom so that the bottom is flat and can sit on your work surface without falling over.
- Make a stem with some extra Paper Mache' and attach it to your pumpkin. Paper Mache' sticks to itself. If you have any trouble getting it to stick, wet your finger and run it across the area you want it to stick to.
- For a small pumpkin, simply take some Paper Mache' and roll it into a ball then flatten the bottom so it can stand up without falling over. Make a small stem and attach it to the top of the pumpkin.
- Let your pumpkins dry completely. Dry time depends on the temperature, humidity and the thickness of your project. It could take a few days to dry completely.
- Once dry, paint the pumpkin orange and the stem green. If desired, paint a face on with black paint or use a permanent marker.
Candy Corn Shelf Sitter:
- Make a ball of Paper Mache' in your hands, then place it on your work surface (be sure your surface is covered with plastic wrap or a plastic bag) and flatten the ball with your palm. Use your thumbs and index fingers to squeeze/shape it into a triangle. Our example is approximately 2 1/2" tall and 1" thick.
- Let your triangle air dry. After it is partially dry, but still soft, use a piece of wire or a pipe cleaner to make two holes in the bottom where the legs will be. Remove the wire/pipe cleaner and do the same where you would like the arms to be. Let the triangle finish drying.
- Use a pencil to lightly draw lines where you would like your three sections to be.
- Paint the top section white, the bottom section yellow then the middle section orange. Let dry. Apply a second coat if desired and let dry again.
- Cut both pipe cleaners in half. You now have four pieces. Make a loop on one end of each piece of pipe cleaner and twist it to keep it in place. These loops will be the hands and feet. Spread a thin layer of white glue on the straight ends of two of the pipe cleaners and push them into the holes you made in the bottom of your candy corn. These are the legs. Bend them at a 90o angle to form the knees as pictured. The other two pipe cleaners are the arms. They may need to be shortened so try them in the arm holes before putting glue on the ends and cut them to the length you desire. Then, spread a little glue on the ends and push them into the arm holes.
- Using black paint and a fine tip brush or a permanent marker, draw a face on your Candy Corn Man.
Optional: Use black pipe cleaners for the arms and legs.