Description
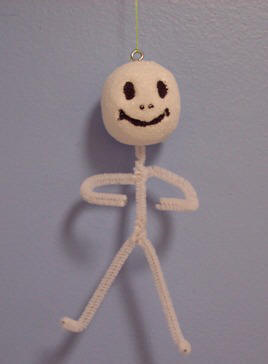
Skeletons made from pipe cleaner and Styrofoam balls are an inexpensive way to decorate your home for Halloween. Fun family craft! Once made they can be hung many places in your home, school or office such as from a ceiling fan, plant, doorknob or ceiling.
Materials and Supplies
Craft Supplies:
- 2" Styrofoam ball
- Two white pipe cleaner
- Black acrylic paint
- Paintbrush
- Screw eye
- Elastic thread
- New pencil with eraser
Craft Instructions
- To sculpt the face, use your thumbs to press on either side of where you want the nose to be (do not push in where the nose will be). Also, press in the Styrofoam under the nose. This compresses the Styrofoam and give it shape.
- Where you would like the eyes to be, use the eraser end of your pencil (it should be a new eraser) to push in the Styrofoam. Make an oval indent for the eyes by pushing the eraser into the Styrofoam twice for each eye overlapping the circles - one just above the other.
- Use the sharpened end of a pencil to carve a mouth under the nose and to make nostrils in the bottom of the nose.
- Compress the sides of the Styrofoam ball with your thumbs and fingers.
- Dip the screw end of a screw eye into white glue and insert in the top of the skeleton head (sculpted Styrofoam ball).
- Cut your pipe cleaner, so that you have one piece 4" long for the body; on piece 6" long for the arms and one piece 6" long for the legs.
- Insert one end of the 4" long piece of pipe cleaner into the bottom of the head. This is the body piece. Wrap the opposite end of this body piece around the center of the leg piece. Fold the legs down as pictured and bend the tips of the legs at a 90o angle to form feet.
- Wrap the center of the arm piece around the body approximately 1/2" down from the head. Bend the arms into desired position.
- Using a fine liner paintbrush and black acrylic paint - paint the groove you carved as a mouth and paint the nostril holes. Using the black paint, paint the indents you made for eyes. You may want to use a thicker brush for this.
- Tie a piece of elastic thread to the screw eye and tie the other end of the elastic thread into a loop and hang him any where you like.