Craft Elf crafts, projects, ideas, patterns, sewing, crochet, knitting and coloring pages Craft Elf

 Craft Instructions, projects, patterns and how to information


Ribbon Candy Ornament

craft project instructions to make ribbon candy ornaments

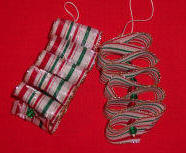
Crafted from ribbon and beads, these Ribbon Candy Christmas Ornaments will look like real ribbon candy on your Christmas tree.

Craft with Food

Fall leaf coaster made from cork and paint
Fall

Tom the turkey can made from a recycled coffee can and craft foam - easy Thanksgiving craft
Thanksgiving

Antler headband craft made from ribbon and craft foam
Christmas

Learn to sew an elf ornament with a free pattern and instructions from Craft Elf
Ornaments

Winter craft project - turn a recycled koolaide container into a snowman
Winter

Step by step cooking and assembly instructions to make a gingerbread house
Gingerbread Houses

Baby shower party favor craft instructions
Party Favors


Learn to sew a sofa door stop weighted with a brick and decorated with a bunny, teddy or other animal
Sewing

Make a picture frame from disposable ashtrays - easy kids craft - great Mother's day craft
General

learn to make airfreshners from teddy bears and wax

Intermediate

free crochet pattern - stuffed octopus
Knit & Crochet

No sew knot wreath made from fabric strips and a recycled coat hanger
Wreaths

Easy kids craft - beaded heart pin for Valentine's Day
Valentine's Day

Easy St. Patrick's Day craft - Pot of gold at the end of the rainbow
St. Patrick's Day


Easy kids Easter craft - Bunny made from Styrofoam balls
Easter

4th of July craft project - Star napkin holder made from Styrofoam
4th of July

Toilet tissue pumpkin - easy kids Halloween craft
Halloween


Hints & Tips
Craft Supplies
Gadget Corner
Sewing Info & Tips


Materials:

  • Ribbon 22 ½" L x 1 ½" w
  • 12 Beads
  • 14" Gold string or white crochet thread
  • Needle (with eye large enough for the string and small enough to fit through the bead)
  • Water soluble marker (one that the marks can be wiped off)
1) With the water soluble marker, make a mark ½" from one end. Make 10 more marks each 2" apart.  These marks should be centered on the ribbon.

2) Thread the needle and knot one end. Be sure the knot is big enough to keep the bead from slipping off.

3) Slide one bead on then, put the needle through the 1st mark on the ribbon. *Place one more bead on then put needle thru ribbon at next mark. Repeat from * to end - Each time you put the needle into the ribbon you will be going thru the opposite side of the ribbon than the previous time. In short, keep flipping the ribbon back and forth.

4) You will end with a bead. I find it easiest to knot the thread before and after you put the last bead on. This will help keep the ribbon candy from loosening up.

5) After you put your last bead on and knot it, tie the remaining string in a loop for hanging.

Printable Instructions

Back to Ornaments

Back Intermediate

Home | Coloring Pages | General Crafts | Holiday Crafts | Food Crafts | Party Favors | Crochet & Knit | Sewing | Wreaths | Gadgets | Hints & Tips | Contact Info | Site Map | Links | Privacy Policy