Description
How to make a simple child's toy:
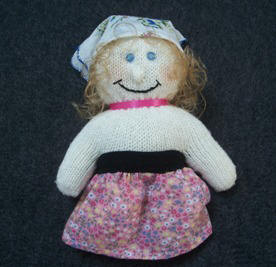
Learn how to make a simple fabric doll. Turn an ordinary knit glove into a doll with very little sewing. She will be so quick to make that you can make them for all the little girls you know.
Materials and Supplies
Craft Supplies:
- Knit glove
- Doll hair
- Woman's hankie
- Two 6mm beads
- Polyester fiberfill (stuffing)
- 8" piece of 3/16" wide ribbon
- Needle & thread
- 3 1/2" x 12" Floral fabric
- 1 1/4" x 7 1/4" Knit fabric
- Powdered blush
- Three strands black embroidery floss
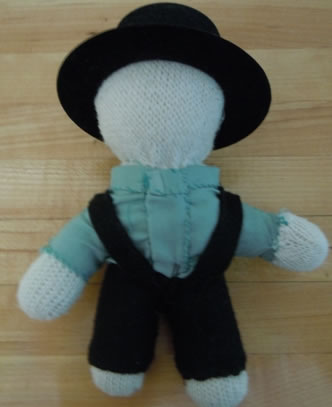
One Craft Elf fan adapted this doll to make an Amish doll as a prop for his religious studies class. Use your imagination and turn this doll or any of our crafts into your very own creation!
Craft Instructions
To Make the Doll:
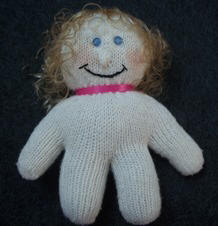
- Push the thumb to the inside of the glove and hand stitch the thumb opening closed.
- Stuff the four remaining fingers with Polyester Fiberfill (stuffing). The two middle fingers will be the legs and the two outer fingers will be the arms. The knit glove will stretch as you stuff the fingers so stretch the two middle fingers long-wise so that they end up longer than the outer fingers (arms).
- Stuff the main part of the glove so it is almost even with the top of the outside fingers. The cuff should still be unstuffed at this point.
- With a needle and thread, do a running stitch around the glove just above the stuffing.
- Pull the thread to gather it. Knot the thread and cut off the excess thread. This forms the neck.
- Stuff the remaining portion of the glove stretching the glove as necessary to make it head sized.
- Do a running stitch around the opening and pull the thread to close the opening. Knot and cut off excess thread.
Completing the Doll:
- Hand stitch the two beads on for eyes. Blue bead were used in the sample.
- Using thread that matches the color of the glove, run a gathering stitch in a circle just below the eyes and pull the thread. This will cause the material to bunch up in the middle of the stitches forming a nose. The larger the circle you stitch the bigger the nose will be.
- Using an outline stitch, stitch the mouth below the nose.
- Brush some powdered blush on the cheeks.
- Take several 10" strands of hair and hand stitch the center of the strands to the top center of the head. The more strands you use, the fuller the head of hair your doll will have.
- Cut an 8 " piece of ribbon. Tie it in a knot around the doll's neck being sure the knot is in the back.
- Fold a ladies handkerchief in half diagonally and tie it on the dolls head as pictured.
- Make the dolls skirt following the directions below and slip it onto the doll.
To Make the Skirt:
- Cut a piece of fabric 12" x 3 1/2".
- Make a narrow hem on one of the 12" sides.
- Fold the fabric in half crosswise with the right sides together so that the two 3 1/2" ends match up.
- Stitch the 3 1/2" ends together using a narrow seam allowance. You now have a tube which is hemmed on one end. This will be the skirt.
- Run a gathering stitch along the un-hemmed edge. Place aside for a moment.
- Cut a 1 1/4" x 7 1/4" piece of knit fabric so that it stretches in the 7 1/4" direction
- Fold the knit fabric in half crosswise with right sides together matching up the two 1 1/4" ends.
- Stitch across the 1 1/4" ends using a narrow seam allowance. This will be the waistband.
- Pull the gathering stitches on the top of the skirt so that the top of the skirt ends up being the same size as the waistband.
- Fold the waistband in half lengthwise and insert the top of the skirt (the waist) into the fold of the waistband matching up the seam in the skirt with the seam of the waistband. Pin in place.
- Top stitch the waistband taking care to go through both layers of the waistband and the waist of the skirt.