Description
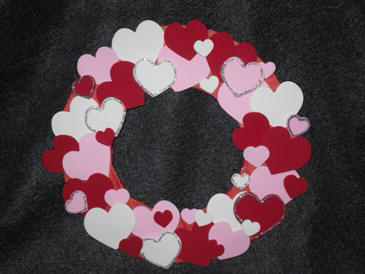
Get ready for Valentine's Day with this easy wreath project made from craft foam hearts.
Materials and Supplies
Craft Supplies:
- Self stick* craft foam hearts in a variety of sizes
- Red tissue paper 10" square
- Glue stick
- Glitter glue (in a squeeze bottle)
- Twist tie or pipe cleaner
- Cardboard 9 1/2" square or larger
- Stapler
*If you don't have self stick hearts, you can glue them on instead.
Craft Instructions
- Cut a 9" circle from cardboard. In the center of this circle, cut out and discard a 5" circle. This is the form for your wreath.
- Twist the ends of a twist tie together leaving a loop in the center of the twist tie. You can also use a 5" piece of pipecleaner.
- Staple the twist tie/pipe cleaner to one side of your wreath form so that the loop section is facing the outside of the circle. The staple should be just below the loop. Then, fold the twisted end up over the staple. This is the hanger for your wreath.
- Lay your wreath form down on your work surface face up. Remember the hanger is on the back side.
- Using a glue stick, spread a layer of glue all over the face of your cardboard wreath form. Lay the tissue paper on top of the glue and press gently to ensure a good bond.
- The tissue should be larger than your circle. At this point, trim the tissue so that it is 1/2" to 3/4" bigger than the cardboard circle. Cut out the tissue paper from the center of the circle leaving 1/2" to 3/4" extra tissue around the inner circle.
- Cut slits in the tissue that extends past the outside and inside of your cardboard. Using the glue stick, glue these edges to the back of the circle. The slits you cut will help the tissue to sit smoothly when you bring it to the backside of the cardboard circle. Note: By covering the cardboard with tissue paper, you won't have to worry that any of the cardboard will show through. The tissue gives it a more finished look.
- Now, simply peel the backs off of craft foam hearts and stick them on to your cardboard circle, layering and overlapping them. We used hearts in four sizes and three colors. Note: Be sure you are holding the wreath form with the hook you attached to the back (the hanger) at the top.
- Using glitter glue, outline several of the hearts.
Suggestions
- If young children are making this wreath, you can have them color the cardboard with markers or crayons instead of covering it with tissue paper.
- Make a bow and glue it at the bottom of your wreath.
- Before permanently attaching the hearts, lay them out on the cardboard with the paper still on the back of them to get an idea of how you would like to arrange them.