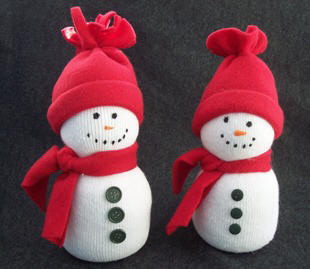
Description
Our sock snowman is so simple and fun, you will want to make a basket full of them to keep by the fireplace.
Materials and Supplies
Craft Supplies:
- White sock; I used a ladies ankle sock but you can use any size sock you have on hand
- 1/2 cup Polly pellets or rice
- Polyester fiberfill (stuffing)
- Fabric paint, in squeeze bottle
- Fleece*
- 2 Small clear hair elastics
- Needle and thread
- 3 Buttons
- White glue; such as Elmer's or tacky
*One piece 9 1/2" x 7" and one 1 1/2" x 17"
Craft Instructions
- Put 1/2 cup of Poly Pellets or Rice into the toe of the sock. This will help your snowman stand up when he is complete.
- Make a ball with the Polyester Fiberfill and put it in the sock on top of the pellets/rice. Then, make a second ball of Fiberfill and add it to the sock.
- Close the top of the sock with one of the elastics (if you don't have elastics, tie it shut with a piece of string.). Trim the top of the sock to about 1 1/2" above the elastic and discard the extra.
- Cut a 1 1/2" x 17" piece of fleece for the scarf. When cutting, be sure the fleece stretches the long way.
- Tie the scarf around the snowman between the two stuffing balls. If desired, cut little slits in the ends of the scarf for fringe.
- Cut a 9 1/2" x 7" piece of fleece for the hat. The fleece should stretch the long way. Fold the fleece in half so the 7" ends line up. Stitch the 7" ends together (by hand or with a sewing machine). Right side out. It should now form a tube. Cuff up one end of the tube. Gather the other end and secure with a small elastic or tie closed with a piece of string.
- Place hat on top of the snowman. If desired, cut slits in the top portion of the hat (the section above where it is gathered)
- Glue 3 buttons on the front of the snowman's belly.
- Apply powdered blush to the cheek area for a rosy appearance. Using the black fabric paint, make two dots for eyes and 5 or 6 dots for the mouth. To make the nose, use orange fabric paint and starting halfway between the eyes and mouth start squeezing out the fabric paint then release pressure and pull away. I recommend practicing on a piece of paper towel or foil before actually painting on the snowman.
Optional: For the face punch holes out of black felt for the eyes and mouth and cut a carrot shape out of orange felt for the nose. Simply glue the felt pieces on using white glue.