Description
Fun Christmas craft for the kids!
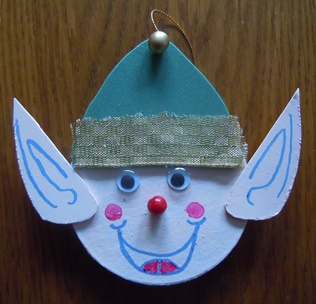
Our elf ornament starts out with a basic paper mache ornament. You paint it and add some embellishments and the plain ornament is transformed into a whimsical elf ornament.
Materials and Supplies
Craft Supplies:
- 3 1/2" Paper mache disk ornament (flat round circle)
- Acrylic paint, flesh, red and either black or gray
- 3/8" Red berry (you could also use a pompom)
- 3/8" Gold berry (you could substitute a bell)
- Two 12mm wiggle eyes
- 1" Wide gold ribbon
- Green craft foam
- Flesh colored or white craft foam
- Tacky glue
Craft Instructions
- Paint one of the flat sides and the edges of a round paper mache ornament. Let dry.
- Cut out two ears from craft foam. If you don't have flesh colored craft foam, you can cut them from white craft foam and paint them to match the face. If you paint them be sure to let them dry.
- Cut out a hat from green craft foam. Cut a piece of ribbon the width of the bottom of the hat and glue it on top of the bottom edge of the hat. Glue either a gold berry or a bell to the tip of the hat.
- Once the paper mache ornament is dry, glue the hat to the top of the ornament. The hat should only cover about 1" at the top of the ornament. Be careful when attaching the hat to be sure the ornament hanger is centered behind the center of the hat so your elf will hang straight when finished.
- With black or gray paint, paint squiggle lines inside each ear as pictured above. You can do this with a permanent marker if you prefer.
- Glue an ear on either side of the elf's face.
- Glue on two wiggle eyes and either a red berry nose or a pompom nose.
- Draw on a mouth. Color in the cheeks with either pink or red paint.
You will need Acrobat Reader to view the pattern as it is a PDF. |
| Printable Instructions | ||
| ||