Description
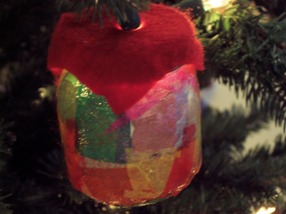
Turn a recycled baby food jar into a drum Christmas ornament with a little Modge Podge and some tissue paper. When you hang it on the tree, stick a Christmas tree light in the top of the drum and it will light up delighting guests.
Materials and Supplies
Craft Supplies:
- Tissue paper in various colors; small amount of each
- Clean glass baby food jar
- Piece of red felt
- Piece of yarn
- Modge Podge
- Sponge applicator or paintbrush
- Tacky glue or a hot glue gun with glue sticks
Craft Instructions
- Tear or cut the tissue paper into small squares.
- Cover the outside of the baby food jar with Modge Podge including the bottom of the jar. Use the sponge applicator or a paintbrush to do this.
- Randomly place the tissue paper squares on the jar, overlapping them as you go.
- Apply a layer of Modge Podge over the tissue paper. Place the jar upside down to dry and let dry completely before continuing.
- Cut a 3 1/2" square from felt and cut a small hole or X in the center of the felt square. An easy way to do this is to fold the square in half and make a small snip in the center of the fold. Then, unfold and fold the square in half the other way and take another snip in the center of the fold.
- Cut a 12" piece of yarn. Fold it in half so that the ends are even and holding the two loose ends together as if they were one, tie an overhand knot.
- Pass the looped end of the yarn through the hole in the felt square but do not pull the knot through the hole. Instead, glue the knot to the opposite side of the felt from where the loop is. The knot should be glued close to the hole. Let this dry before proceeding or use a hot glue gun to avoid the need to wait.
- Put glue around the threads of the jar and on the top rim. Place the felt square on top of the jar with the loop side facing up and fold the edges of the felt square down into the glue. If using white glue, wrap an elastic around the felt until the glue dries. Then, remove the elastic. If you use a hot glue gun you won't need the elastic.
Hang your drum ornament on the tree by the yarn loop and be sure to hang it next to a light on the tree. Then, simply put one of the tree lights into the hole in the felt to light your ornament.