Description
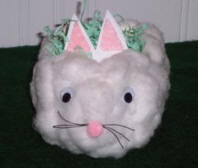
Get ready for Easter by crafting this festive Easter basket made from a recycled milk carton. Great project for kids!
Materials and Supplies
Craft Supplies:
- One empty ½ pint cardboard Milk Carton
- Two 12mm googly eyes
- Small pink pompom
- ½" pompom, for tail, pink or color of choice
- White cotton balls
- 12" of Black button thread
- Scrap pink felt
- 2" x 2 ½" piece white craft foam
- Stapler
- Fake Easter grass
- Craft Glue
Craft Instructions
- Wash and dry the milk carton thoroughly.
- Close the milk carton and staple it shut.
- Now, lay the carton on it's side so that the front side is facing the ceiling - if it is laying correctly, the end you stapled shut should be facing up and down (not side to side). This stapled end (originally the top) will be the head section.
- Cut out and discard the rectangle part of the carton that is facing the ceiling. This will create the opening for your bunny basket.
- Cut 2 triangles from the white craft foam for the ears. Staple the bottom of each triangle to the inside of the carton along the cut edge so that the ears will be just above the head.
- Cover the entire outside surface of the carton with glue except for the bottom.
- Cover the glued areas with cotton balls.
- Cut 2 triangles from the pink felt a little smaller than you cut the white triangles so they will fit inside the white triangle ears. Glue the pink triangles inside the white ones.
- Glue the ½" pompom to the flat end opposite the head end - this is your bunny's tail.
- Fold the black button thread in thirds and tie a knot in the center. Trim the ends. These are your bunny's whiskers.
- Approximately half way down the bunny's face, glue the whiskers onto the bunny. The easiest way to do this is to place a drop of glue where you want the whiskers, then, holding both ends of the whiskers, place the knot on top of the glue. Now add another drop of glue on top of this and place your small pink pompom on it.
- Glue your googly eyes onto the bunny's face.
- Fill the opening with Easter grass and your Bunny is ready to be filled with candy.