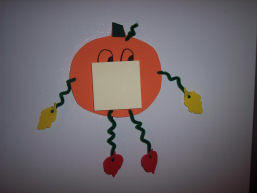
Description
This pumpkin duo will help decorate your refrigerator. Both are magnetic and made from craft foam. Great project for children. Includes full size pumpkin pattern.
Materials and Supplies
Craft Supplies: (for each pumpkin) :
- 2 Green Chenille Stems (Pipe cleaners)
- Craft Glue
- 1 pad post-it-notes (for note holder)
- Scrap Green Felt
- 7" Square of Orange Craft Foam
- Black Permanent Marker
- one piece 1 ½" x 1" Magnet or two pieces 1 ½" x ½" magnet
- 4 Craft foam leaves approximately 2" long (or scraps of craft foam to cut your own)

Craft Instructions
- Trace and cut out pumpkin shape from orange craft foam.
- Cut two 4 1/4" pipe cleaners for arms; cut two 5 ½" pipe cleaners for legs and one 2 1/4" piece for vine.
- If you don not have pre-cut craft foam leaves you will need to cut 4 (2 for hands and 2 for feet) leaves from scraps of craft foam.
- Decide which 2 leaves will be used for the hands and poke one end of the 4 ½" pipe cleaner into the leaf from the back and then poke it back thru the leaf to the backside. Repeat to make the second arm and hand.
- Wrap the pipe cleaners around a pencil or pen, slide it off the pencil and gently pull to stretch it a little. Be sure not to curl too close to the end.
- With the end of the pipe cleaner which is opposite the leaf hands, poke it through one side of the pumpkin close to the edge and twist to secure it together with itself. Repeat with the second arm.
- Repeat step 4 only use the 5 ½" pipe cleaners and the two leaves you want for feet.
- Repeat steps 5 and 6 with the legs but secure them to the bottom of the pumpkin.
- Cut a piece of green felt to cover the stem and glue it in place.
- Poke the 2 1/4" piece of pipe cleaner thru the pumpkin near the stem and fold the end over to hold it in place. Curl slightly around a pencil or your fingertip.
- Attach magnet to the back of the pumpkin.
- For regular pumpkin magnet, draw a face and you are done.
- For notepad pumpkin, glue the back of a pad of post-its (w/ craft glue) to the center of the pumpkin and draw eyes above it.
*If you use up all the paper in your notepad simply glue on another post-it pad.