Description
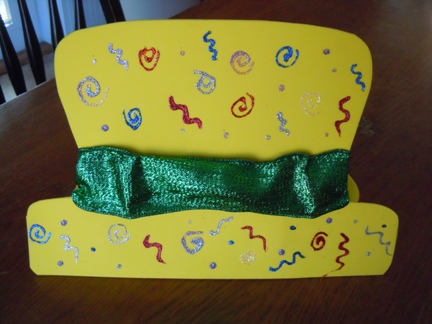
You can make a crazy hat from craft foam with our hat pattern and instructions. It is the perfect party hat to wear to the Mad Hatter's tea party or for playing dress up.
Important: Set your margins to 0 before printing the pattern as the pattern goes all the way to the edge of the paper.
Materials and Supplies
Craft Supplies:
- Craft foam; two 8 1/2" x 11" sheets*
- Glitter glue
- 2" Wide wire edged ribbon**; 12" long
- Hot glue gun or HEAVY duty double sided tape
* The actual amount you need of craft foam is one 8 1/2" x 11" sheet plus two strips measuring 11" x 1 1/2".
**You can substitute regular ribbon for the wire edged ribbon but the wire edge makes the ribbon look bunchy and "crazy".
Craft Instructions
- Trace the hat pattern onto a piece of craft foam. Note that the lower edge or the hat pattern lines up with the edge of the craft foam.
- Cut out the hat and cut two 1 1/2" x 11" strips from the craft foam.
- Place the hat flat on your work surface with the backside facing up (the side with the tracing lines). Using either hot glue or heavy duty double sided tape, attach one of the craft foam strips approximately 2 1/2" in from one side and 3/4" up from the bottom of the hat. Repeat with the other strip (gluing it to the opposite side of the back of the hat).
- On one strip, cut two slits 3/4 of the way through going from top to bottom. On the other strip, cut two slits in the same manner only this time going from bottom to top. Be very careful not to cut all the way through. To determine where the slits should be, cut the two slits on one strip then have the child hold the hat up to their head. Wrap the strips around their head and mark two spots where the slits you cut line up on the second strip.
- Cut a 12" piece of ribbon. Lay it across the front of the hat just above the "brim" as pictured. Bring the two ends around to the back of the hat and glue in place.
- Lay the hat flat on your work surface (unhook the two strips so the hat lays flat). Using glitter glue, draw swirls, squiggles and dots OR any other design you choose.
- Once the glitter glue is dry, you can bring the two strips around to the back of the hat and interlock the slits together. Your hat is now ready to wear.
Idea: If you don't have glitter glue or feel it is too messy for your child or group, you can use markers or self stick craft foam shapes to decorate your hat.
You will need Acrobat Reader to view the pattern as it is a PDF. |
| Printable Instructions | ||
|
||
| Back General |