Description
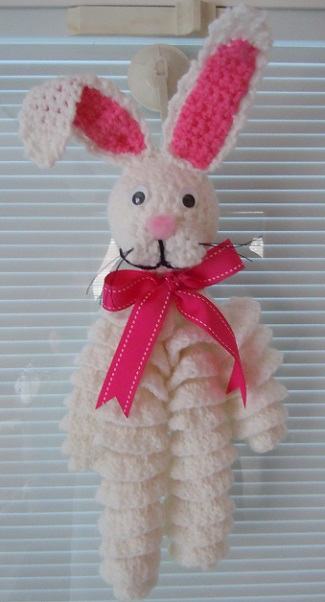
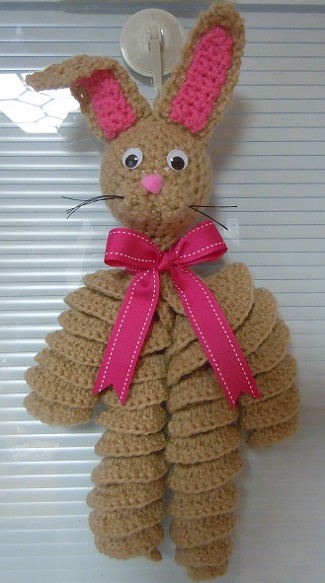
With our detailed free crochet pattern you can make an Easter Bunny decoration. He can either be hung up by a hook on the back of his head or sit on a shelf or mantel. No matter how you display this Easter bunny, he will be an adorable addition to your Easter decorations.
It takes less then one skein of yarn to make our crochet Easter bunny. Our samples show him in both tan and white but it would be fun to make a bunny using pastel colored yarn!
It doesn't show as well as I would like in the photo but this little bunny has three dimensional cheeks.
Note: You can fold the ears over if your like or keep them straight up and down. It's up to you.
Materials and Supplies
Crochet Supplies:
- Crochet hook size G
- 5oz Tan or white worsted weight yarn
- Small amount pink and white worsted weight yarn
- Yarn needle
- 3" Styrofoam ball
- Two 15mm wiggle eyes
- 1/2" pink pompom
- Black button thread
- 1" Wide ribbon approximately 24" long
Abbreviations:
- ch = chain
- sc = single crochet
- dc = double crochet
- tc = triple crochet
- slst = slip stitch
- beg = beginning
- sk = skip
- rep = repeat
Craft Instructions
Legs (make 2):
- Chain 37; turn
- Row 1: 2 dc in 3rd ch from hook, 3 dc in rem ch; ch 3 turn
- Row 2: 2 dc in 1st dc, 3 dc in next dc, 2 dc in next 2 dc, *3 dc in next 2 dc, 2 dc in next 2 dc; repeat from * to end of row; fasten off and weave loose ends back into your work.
Arms (make 2):
- Chain 25; and follow instructions for rows 1 and 2 of legs.
Outer Ear (make 2):
- With main color (in our case white or tan) chain 7
- Sc in 2nd ch and each ch across (6)
- Rows 2 - 9: Sc in each sc across
- Row 10: Sk next sc, sc in remaining sc across (5)
- Rows 11 - 16: Sc in each sc
- Row 17: Rep row 10 (4)
- Row 18: Rep row 10 (3)
- Row 19: Rep row 10 (2)
- Fasten off and weave loose ends back into your work.
Inner Ear (make 2):
- With pink worsted weight yarn, ch 4
- Sc in 2nd ch from hook and each ch across (3)
- Sc in each sc across for 9 more rows
- Sk 1 sc; sc in rem 2 sc
- Fasten off and weave loose ends back into your work
Head:
- Chain 4, join to form a ring; work 10 sc in ring
- Round 2: *1 sc in next sc, 2sc in next sc; repeat from * around (15)
- Round 3: *1 sc in each of next 3 sc, 2sc in next sc; repeat from * around (18)
- Round 4: *1 sc in each of next 4 sc, 2sc in next sc; repeat from * around (21)
- Round 5: *1 sc in each of next 5 sc, 2sc in next sc; repeat from * around (24)
- Round 6 through 13: work even
- Round 14: *sk 1, 1 sc in each of next 5 sc; repeat from * around. Insert Styrofoam ball before finishing.
- Round 15: *sk 1, 1 sc in each of next 4 sc; repeat from * around.
- Round 16: *sk 1, 1 sc in each of next 3 sc; repeat from * around.
- Decrease to close
- Fasten off and weave loose ends back into your work.
Cheeks (make 2):
- Ch 4 join to form a ring
- 4 sc in ring
- 2 sc in each sc around
- After the first cheek, fasten off and weave loose ends back into your work. After the second cheek, before fastening it off, attach it to the first cheek with two slip stitches going through one loop of each cheek.
Finish:
- After knotting off and cutting each piece weave loose ends back into crocheted piece using a yarn needle. This helps hide the knots and end pieces of yarn
- Sew arms and legs together with yarn needle and a matching piece of yarn.* Make sure the legs are on the inside and the arms on the outside.
- Stitch the arm/leg assembly to the bottom of the head.
- Stitch one inner ear to the center of each outer ear. Use pink yarn to do this but be careful not to go through to the back of the ear.
- Stitch the lower portion of both ears to the top of the head.
- Stitch the "cheeks" just below the center of the face.
- To make whiskers, cut two 7" pieces of button thread. Fold the two strands in half and tie a knot just above the fold. Thread the loose ends of the button thread onto a yarn or tapestry needle. Slip the needle between two of the stitches on the bunny's cheeks then come back out in the center of one of the crochet stitches. The knot will now be on the backside of the cheeks. Repeat to make whiskers coming out of the other cheek. Trim the ends of the whiskers to the length you desire.
- Cut a pink pom pom into a triangle shape and glue it as an upside down triangle just above the center of the cheeks.
- Glue on two eyes above the nose and cheeks.
- Tie a ribbon in a bow around the bunny's neck. Cut the ends of the ribbon either in a V shape or on an angle.
- Make a pompom from white or white and tan worsted weight yarn. Use the two tying strands of yarn to attach it to the back side of the bunny. To attach it, thread these strands of yarn onto a yarn needle (one at a time) and pass the needle through both legs about 3.5" below the neck. Remove the needle and tie the strands in a knot.
- Work a chain 8 stitches long and join with a slst to form a loop and attach it to the back of the head to hang him on the wall.
- Optional: Use black yarn or embroidery floss to stitch a mouth by making a straight line down between the cheeks then go across under each cheek following the natural curve.
*I have always found the easiest way to join the arms and legs together is to line up the top of the arms and legs altogether and whip stitch the top 1 1/2" or so with a yarn needle and matching yarn. Be sure to put the two legs between the arms.
To Make a pompom:- Wrap the yarn around four of your fingers fifty times.
- Cut the yarn off the skein and slide the wrapped yarn off your fingers.
- Using a piece of yarn approximately 20" long, tie it securely in a knot* around the center of your wrapped yarn.
- Trim the pompom so that it is neat looking but be sure not to cut the long string that you tied it with. Don't worry if it seems you are taking a lot of yarn off when you trim.
*When you wrap the yarn around to tie it, tuck it under twice before pulling tight and completing the knot. It will stay much tighter this way.