Description
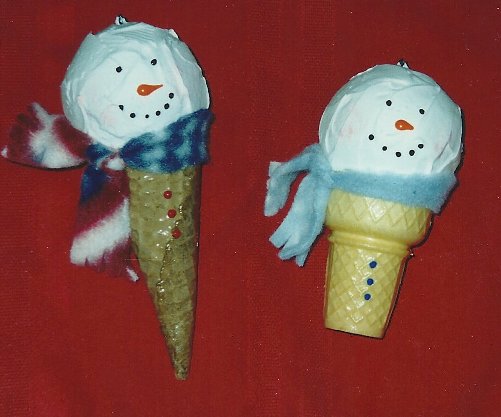
Yes, these ice cream snowmen are made using REAL ice cream cones. Not to worry, they are sealed completely so they will not crumble or attract bugs. If stored properly, in a cool dry place - no attics or basements, they will last for years. I have had mine for over 12 years and they still look great!
Materials and Supplies
Craft Supplies:
- Ice cream cone
- 2" Styrofoam ball
- Aleene's Glitter Snow (or similar product)
- Varnish (paint on type)
- Hot glue gun
- Disposable plastic knife
- Paintbrush
- Pink acrylic paint (or fabric paint)
- Paint in squeeze bottles red, orange, black*
- Eye hook
- Fleece or flannel; small piece
*I used fabric paint.
Craft Instructions
- Paint the inside of the ice cream cone with varnish. You can use either sugar cones or cake cones but it is easier to paint the inside of the sugar cone as the cake cones have a bunch of little sections inside. In any case, make sure you completely coat the inside of the cone. LET DRY COMPLETELY before proceeding
- Paint the outside of the cone with varnish and let dry thoroughly. It is important that your cone is completely coated to keep out bugs and preserve the cone for years of enjoyment. Note: If you paint both the inside and outside of the cone at the same time, the cone will become soft and may loose it's shape.
- Hot glue the Styrofoam ball on top of the cone.
- Using a plastic knife, completely cover the Styrofoam ball with the Glitter Snow. It shouldn't be spread too smooth because ice cream would not be completely smooth.
- While the snow is still wet, press the screw end of the eye hook into the top center of the Styrofoam ball. Let dry completely. If you are only making a couple, you can place the cones in a cup while they dry. If you are making a larger quantity, get a box (almost any type of box will work but a good example is a shoe box) Flip the box upside down and make holes in the bottom of the box. Place one cone in each hole so it can dry. Be careful that none of the cones are touching each other.
- Cut a strip of fabric 1" wide x 15" long. Tie it around the snowman's neck, where the cone and Styrofoam ball meet. Using hot glue, tack it in place. Cut the ends at an angle. If you like, you can also make small snips on the ends for fringe.
- Using a dry brush method, apply some pink paint to the cheeks. Check out our hints and tips section to learn how to dry brush. Using orange paint, make a carrot nose in the center of the snowman's face. To make the nose, start squeezing out some orange paint and release pressure as you pull the paint toward the right (or left). Practice on a piece of foil or a paper towel. You could also cut out a nose from orange craft foam or felt and glue it on.
- Squeeze out two dots of black paint above the nose to form the eyes. Squeeze out 5 or 6 black dots to form the mouth. Using red (or another holiday color) paint make three dots down the center of the cone for buttons.
- Thread a piece of string or monofilament through the hook on top for hanging or use an ornament hook.
Idea: Make a smaller version using mini cones and smaller Styrofoam balls.