Description
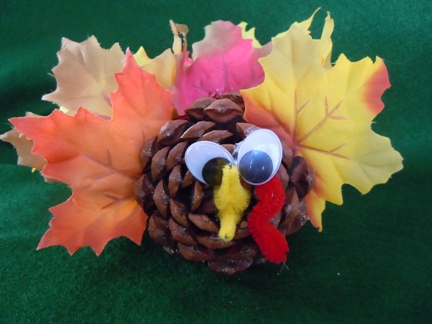
Our pine cone turkey is a very simple Thanksgiving craft to make. You can easily turn him into a place card holder by writing each guest's name on a piece of card stock and simply place it among the turkey's feathers. I do not suggest gluing the name to the turkey so that the name can be removed after dinner and the turkeys can become decorations for Thanksgiving.
Materials and Supplies
Craft supplies:
- Hot glue gun & glue sticks
- Two 20mm oval wiggle eyes
- Pine cone - a short fat one works best. Our pine cone is about 3" wide and 4" long
- Pipe cleaners; 1 red and 1 yellow
- Artificial fall leaves that are proportionate in size to your pine cone. Our leaves range from 2 1/2" long to 3 1/2" long not including the stem.
Craft Instructions
- Choose a pine cone that has a good shape, short and wide.
- You can either find pine cones out in nature or purchase them at your local craft store. If you purchase them you can skip right to step 2. If you find the pine cones outside, you will need to dry them out before you use them to craft with. To dry out pine cones; Preheat the oven to 225 degrees. Line a baking sheet with foil to protect it from pine cone sap. Spread pine cones out in a single layer on foil lined baking sheet. Bake for 20 minutes. After the 20 minutes of baking, turn off the oven and leave the pine cones in the oven (with the door shut) for an additional 2 hours to finish drying.
- Make a face on the wide end of the pine cone by cutting a 3" piece of yellow pipe cleaner for the beak. Fold it in half and hot glue the fold inside the center of the wide end of the pine cone. Cut a 4" piece of red pipe cleaner and fold it in half. Bend it a couple of times to give it the look of a waddle. Glue the "waddle" to the pine cone just to the side of the beak. Glue the two wiggle eye above the beak.
- Stick the leaves into the spaces in the pine cone and hot glue them in place.