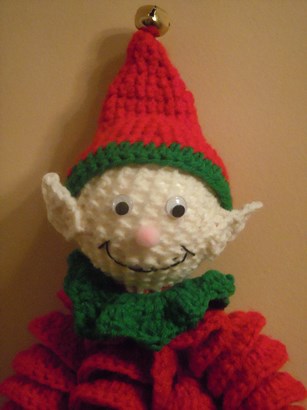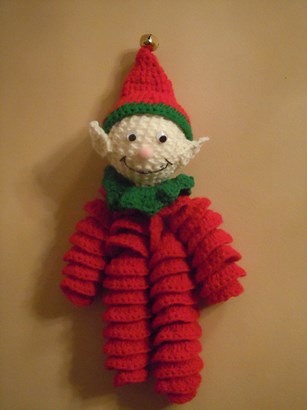
Description
Make an elf with our easy to follow Christmas crochet pattern. Our Christmas elf makes a great decoration whether he is sitting on the mantel or hanging on the wall. You can also make one of our elves to continue or start the Magic Elf Tradition. If you are not familiar with this tradition, it is an interactive activity for the Christmas season where Santa sends an elf to visit and check up on who is naughty and nice. Sometimes the elf gets in a little mischief. Organized Christmas does a good job of explaining this tradition in detail. You many recognize this activity by the name of "Elf on the Shelf"
Our elf measures approximately 16" from the tip of his leg to the top of his hat.
If you have children under the age of three, you may want to embroider on a nose and eyes instead of gluing them on to prevent the children from choking on any small parts.
Materials and Supplies
Craft Supplies:
- Crochet hook size G or H
- 5oz Worsted weight yarn - main color (our sample was made with red)
- Small amount flesh colored worsted weight yarn
- Small amount contrasting color worsted weight yarn (we used green in our sample)
- Yarn needle
- 3" Styrofoam ball
- 1/4" or 3/8" pink pompom
- 20mm Bell
- Two 12mm wiggle eyes
- Black embroidery floss
- Embroidery needle
- Tacky glue
Our elf was made with a red body and green accents but he would also look cute with a green body and red accents.
Abbreviations:
- ch = chain
- sc = single crochet
- dc = double crochet
- tc = triple crochet
- slst = slip stitch
- sk = skip
- rem = remaining
Craft Instructions
Legs (make 2):
- With red chain 37; turn
- Row 1: 2 dc in 3rd ch from hook, 3 dc in rem ch; ch 3 turn
- Row 2: 2 dc in 1st dc, 3 dc in next dc, 2 dc in next 2 dc, *3 dc in next 2 dc, 2 dc in next 2 dc; repeat from * to end of row; fasten off and weave loose ends back into your work.
Arms (make 2):
- With red chain 25; and follow instructions for rows 1 and 2 of legs.
Collar:
- With green chain 20
- 2dc in 2nd ch and in each chain across; ch 1 turn
- *Sc in 1st st, (dc, tc, dc) in next stitch, sc in each of next two sts; Repeat from * across row.
- Fasten off and weave loose ends in.
Hat:
- With red chain 4 join to form ring
- 6 sc in ring
- *2sc in next sc, sc in next sc; repeat from * around (9)
- Work even for one round
- *2sc in next sc, sc in next sc; repeat from * around (14)
- Work even for one round
- *2sc in next sc, sc in next sc; repeat from * around (21)
- Work even for 2 rounds
- *1 sc in each of next 2 sc, 2 sc in next sc; repeat from * around (28)
- Work even for 3 rounds
- *1 sc in each of next 3 sc, 2 sc in next sc; repeat from * around (35)
- Work even for 1 round
- *1 sc in each of next 4 sc, 2 sc in next sc; repeat from * around (42)
- Change to green; ch 2, 1dc in each stitch around.
- Join with a slst to beg ch 2.
- Fasten off and weave loose ends back into your work.
Head:
- With flesh colored yarn, chain 4, join to form a ring; work 10 sc in ring
- Round 2: *1 sc in next sc, 2sc in next sc; repeat from * around (15)
- Round 3: *1 sc in each of next 3 sc, 2sc in next sc; repeat from * around (18)
- Round 4: *1 sc in each of next 4 sc, 2sc in next sc; repeat from * around (21)
- Round 5: *1 sc in each of next 5 sc, 2sc in next sc; repeat from * around (24)
- Round 6 through 13: work even
- Round 14: *sk 1, 1 sc in each of next 5 sc; repeat from * around. Insert Styrofoam ball before finishing.
- Round 15: *sk 1, 1 sc in each of next 4 sc; repeat from * around.
- Round 16: *sk 1, 1 sc in each of next 3 sc; repeat from * around.
- Decrease to close
- Fasten off and weave loose ends back into your work.
Ears (make 2):
- With flesh color, chain 4, join with a slst to form a ring
- 1 sc in each ch around (4)
- 2 sc in each sc around (8)
- Ch 3 turn
- Working back into ch, slst in each stitch
- Join with slst to next sc on the original round
Finish:
- After knotting off and cutting each piece weave loose ends back into crocheted piece using a yarn needle. This helps hide the knots and end pieces of yarn
- Sew arms and legs together with yarn needle and a matching piece of yarn.* Make sure the legs are on the inside and the arms on the outside.
- Stitch the arm/leg assembly to the bottom of the head.
- Attach a bell to the top of the hat.
- Place the hat on the elf's head and tip it to adjust it to where you want it. Stitch the hat in place.
- Stitch one ear on either side of the head as pictured. Only stitch the bottom portion of the ear. Leave the pointed (top) portion loose so that it overlaps the hat.
- Wrap the collar around the elf's neck. Overlap the ends of the collar and stitch them together. You can either leave the collar loose or if you prefer, you can also stitch it to the bottom of the elf's head.
- Glue on two eyes and a pompom nose to the elf's face.
- Using black embroidery floss and the back stitch, stitch a mouth on you elf.
- Optional: work a chain of desired length to form a loop and attach it to the back of the elf's hat to hang him on the wall.
*I have always found the easiest way to join the arms and legs together is to line up the top of the arms and legs altogether and whip stitch the top 1 1/2" or so with a yarn needle and matching yarn. Be sure to put the two legs between the arms.