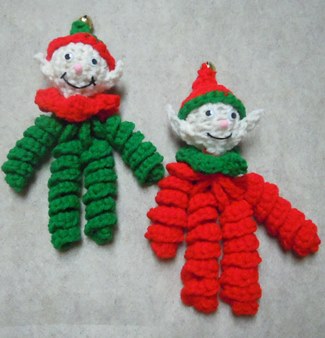
Description
Elf crafts can be hard to find but we have designed an adorable crochet pattern to make crochet elf ornaments for your Christmas tree. These whimsical little guys have an old fashioned look and will be a family favorite. Crochet a set of elves along with our Curly Snowman Ornament and give them as a gift.
Materials and Supplies
Crochet Supplies:
- Size G crochet hook
- Worsted weight yarn; red, green and flesh color
- 1.5" Styrofoam Ball
- Two 7mm wiggle eyes
- 1/2" Bell
- 5mm Pink pompom (or any small size)
- Black embroidery floss
- Embroidery needle and yarn needle
- Monofilament
- Tacky glue
Abbreviations:
- sc = single crochet
- slst = slip stitch
- ch = chain
- st = stitch
- dc = double crochet
- tc = triple crochet
- sk = skip
Craft Instructions
Note: The instructions are written for the elf with the green body. To make the elf with the red body, just switch the red for green and the green for red in the instructions.
Legs - make 2:
- With green, ch 30
- 2 sc in 2nd ch from hook; 3 sc in remaining ch.
- Cut yarn. Fasten off and weave loose ends back into your work.
Arms - make 2:
- With green, ch 25
- 2 sc in 2nd ch from hook; 3 sc in remaining ch.
- Cut yarn. Fasten off and weave loose ends back into your work.
Hat:
- With green ch 3, join to form a ring
- 4 sc in ring
- 2 sc in each sc (8)
- Attach a bell to the tip of the hat (it is much easier to do it now than when the hat is finished)
- Work even for 1 round
- *sc in 1st sc, 2 sc in next sc. Repeat from * around. (12)
- *2 sc in next sc, 1 sc in each of next 2 sc. Repeat from* around (16)
- *2 sc in next sc, 1 sc in each of next 3 sc. Repeat from * around (20)
- Change color to red and work even for 1 round. Join with slst to beginning ch.
- Fasten off and weave loose ends in.
Head:
- With flesh colored yarn, ch 3, join with slst to form a ring
- 8 sc in ring
- *sc in 1st sc, 2 sc in next sc. Repeat form * around (12)
- *1 Sc in each of the next 2 sc, 2 sc in next sc. Repeat form * around (16)
- Work even for 2 rounds
- Insert a 1.5" Styrofoam ball into the head and continue to crochet with the ball inside.
- Sc in 1st st, *sk 1, sc in next 2 sts. Repeat from * around (11)
- Sc in 1st st, * sk 1, sc in next sc. Repeat from * around (6)
- *Sk 1 st, slst in next. Repeat from * around (3)
- Fasten off and weave loose ends back into your work.
- Sew the hat on top of the elf's head.
Ears - make 2:
- With flesh colored yarn, leave an 8" tail, Ch 4
- Sc in 1st sc, 1 sc in next sc, 2 sc in next sc, ch 1
- Fasten off and weave ending string back into your work. Use the beginning sting (tail) to stitch the ear to one side of the head. Refer to photo for approximate position. Only stitch the bottom portion of the ear onto the elf's head the top portion should overlap the hat and remain loose.
Collar:
- With red, ch 16
- Sc in 2nd ch form hook, *(dc, tc, dc) in next ch, 1 sc in each of next 2 chains. Repeat from * across row.
- Fasten off and weave loose ends back into your work.
Assemble your Elf:
- The easiest way to join the arms and legs together is to line up the top of the arms and legs altogether and whip stitch the top 1" or so with a yarn needle and matching yarn. Then stitch the whole arm leg assembly to the bottom of the head assembly. Be sure to put the two legs between the arms.
- Wrap the collar around the elf's neck and stitch the two ends together in the back.
- Glue on two 7mm eyes and a pompom nose.
- Using black embroidery floss and an embroidery needle stitch on a mouth. Make a 1/4" stitch at an angle then come up from underneath in the center of this stitch. Make a stitch that is about 1" from side to side letting the floss hang down (do not pull taught). Then, make another 1/4" stitch across the other end of the smile. Knot off the floss and tuck the ends of the floss under the yarn on the face to hide it.
- Thread a piece of monofilament through the top of the elf's hat and tie the ends in an overhand knot. This will be the ornament hanger.